Deploy the Orb sensor on macOS using Microsoft Intune
This guide walks you through deploying the Orb sensor to a macOS fleet using Microsoft Intune. The guide covers:
- What the sensor package installs, and how it differs from the Orb app
- Delivering your Deployment Token with a configuration profile
- Allowing the sensor's background item so it starts at login
- Adding the package as a macOS PKG app, and assigning it
- Verifying, controlling updates, and uninstalling
- The files and processes to allow-list in endpoint security tools
Requirements:
- An Orb Cloud subscription that includes Deployment Tokens (all paid plans)
- Microsoft Intune, and administrative access to the Microsoft Intune admin center
- macOS 11.0 or later, enrolled in Intune, with the Intune macOS agent installed
- A Deployment Token for your Space
Orb sensor package
The sensor ships as a flat, signed installer package. The package is currently available for testing on request.
The macOS sensor runs as a LaunchAgent in the user's GUI session (LimitLoadToSessionType is Aqua), not as a system daemon. A user must be logged in for it to report.
If you need reporting from an unattended Mac, contact Orb support.
The sensor and the Orb app register with Orb Cloud separately, so a Mac running both appears twice in your Space under the same hostname. Deploy one or the other unless you specifically want both.
Deploy the configuration profile first
The sensor reads its managed settings from /Library/Managed Preferences/net.orb.orb.plist, which macOS writes when a configuration profile containing a net.orb.orb payload is installed.
Create and assign the configuration profile before the app, to the same group.
Intune does not guarantee the order in which a profile and an app reach a device, so this is not a hard guarantee — but in practice a configuration profile applies well before a PKG app, because the app cannot install until the Intune management agent is itself installed. Getting the profile in place first makes the race moot.
If a sensor does start before its token arrives, it runs unlinked and the Mac does not appear in your Space. Once the profile lands, restart the agent to pick it up:
launchctl kickstart -k "gui/$(id -u)/net.orb.sensor"Create a Deployment Token
- Visit https://cloud.orb.net/orchestration
- Select Create new token
- Enter a name and select Create
- Keep this page open for the next step
Use a dedicated, revocable token per deployment so you can attribute devices and revoke access without disrupting other rollouts.
Create the .mobileconfig
Create a file named orb-sensor.mobileconfig with the following contents. This is the recommended baseline for a managed deployment: it links the Orb to your Space, keeps the introduction visible so users can grant Location, and keeps the sensor off mDNS.
<?xml version="1.0" encoding="UTF-8"?>
<!DOCTYPE plist PUBLIC "-//Apple//DTD PLIST 1.0//EN" "http://www.apple.com/DTDs/PropertyList-1.0.dtd">
<plist version="1.0">
<dict>
    <key>PayloadContent</key>
    <array>
        <dict>
            <key>PayloadType</key>
            <string>net.orb.orb</string>
            <key>PayloadVersion</key>
            <integer>1</integer>
            <key>PayloadIdentifier</key>
            <string>net.orb.orb.deployment</string>
            <key>PayloadUUID</key>
            <string>REPLACE-WITH-UUID-1</string>
            <key>PayloadDisplayName</key>
            <string>Orb Deployment Configuration</string>
            <key>PayloadOrganization</key>
            <string>Your Organization</string>
            <key>OrbDeploymentToken</key>
            <string>REPLACE-WITH-YOUR-DEPLOYMENT-TOKEN</string>
            <key>OrbSkipIntroduction</key>
            <false/>
            <key>OrbZeroconfPublish</key>
            <false/>
            <key>OrbZeroconfBrowse</key>
            <false/>
        </dict>
    </array>
    <key>PayloadDisplayName</key>
    <string>Orb Sensor Configuration</string>
    <key>PayloadIdentifier</key>
    <string>net.orb.orb.configuration</string>
    <key>PayloadOrganization</key>
    <string>Your Organization</string>
    <key>PayloadRemovalDisallowed</key>
    <false/>
    <key>PayloadType</key>
    <string>Configuration</string>
    <key>PayloadUUID</key>
    <string>REPLACE-WITH-UUID-2</string>
    <key>PayloadVersion</key>
    <integer>1</integer>
    <key>PayloadScope</key>
    <string>System</string>
</dict>
</plist>
Replace the placeholders:
- Generate two UUIDs. On macOS, run
uuidgentwice in Terminal, oruuidgen | pbcopyto copy one at a time. - Substitute them for
REPLACE-WITH-UUID-1andREPLACE-WITH-UUID-2. - Substitute your Deployment Token for
REPLACE-WITH-YOUR-DEPLOYMENT-TOKEN.
Why each setting is as it is:
| Setting | Why |
|---|---|
OrbSkipIntroduction false |
Keeps the first-run introduction visible, which is how users learn that Location is needed and where they grant it. Without it you lose SSID and BSSID. |
OrbZeroconfPublish false |
Stops the sensor advertising itself over mDNS, which most managed fleets do not want. |
OrbZeroconfBrowse false |
Stops the sensor discovering other Orbs over mDNS. |
If you want the sensor to report a name other than the hostname, add OrbDeviceNameOverride. Leave the remaining keys unset unless Orb support directs otherwise.
Supported keys
| Key | Type | Effect |
|---|---|---|
OrbDeploymentToken |
String | Links the Orb to your Space. Required for unattended deployment. |
OrbDeviceNameOverride |
String | Name the device reports in your Space. Omit to use the hostname. |
OrbSkipIntroduction |
Boolean | Suppresses the first-run introduction. See the warning below before setting this. |
OrbZeroconfPublish |
Boolean | false stops the sensor advertising itself over mDNS. |
OrbZeroconfBrowse |
Boolean | false stops the sensor discovering other Orbs over mDNS. |
Do not suppress the sensor's interface if you want SSID and BSSID.
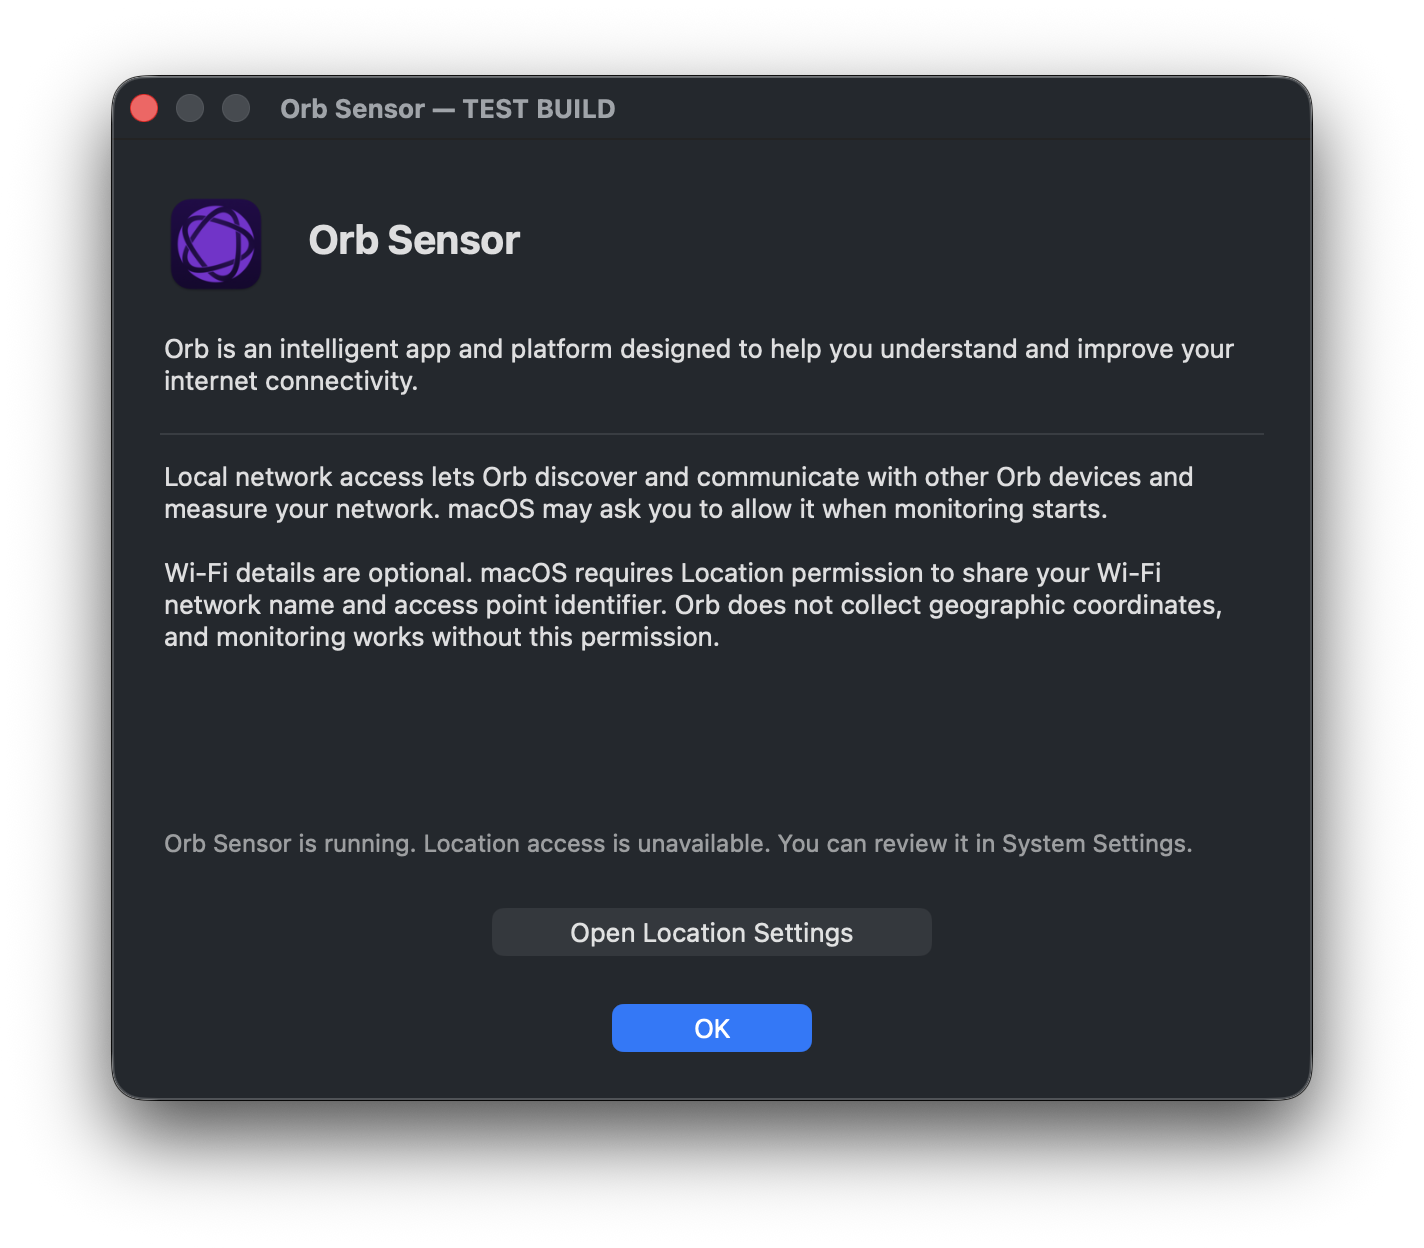
The sensor shows a short introduction the first time it runs for a user. That introduction is where the user is told that macOS requires Location permission to report the Wi-Fi network name (SSID) and access point (BSSID), and it is where they are given the button to grant it. Setting OrbSkipIntroduction to true hides the introduction, so the user is never told and never grants Location — and those fields stay empty, with nothing in the console to indicate why.
Without Location, the introduction reports that Wi-Fi details are unavailable and offers Open Location Settings:
Once Location is granted, it confirms that Wi-Fi details are enabled:
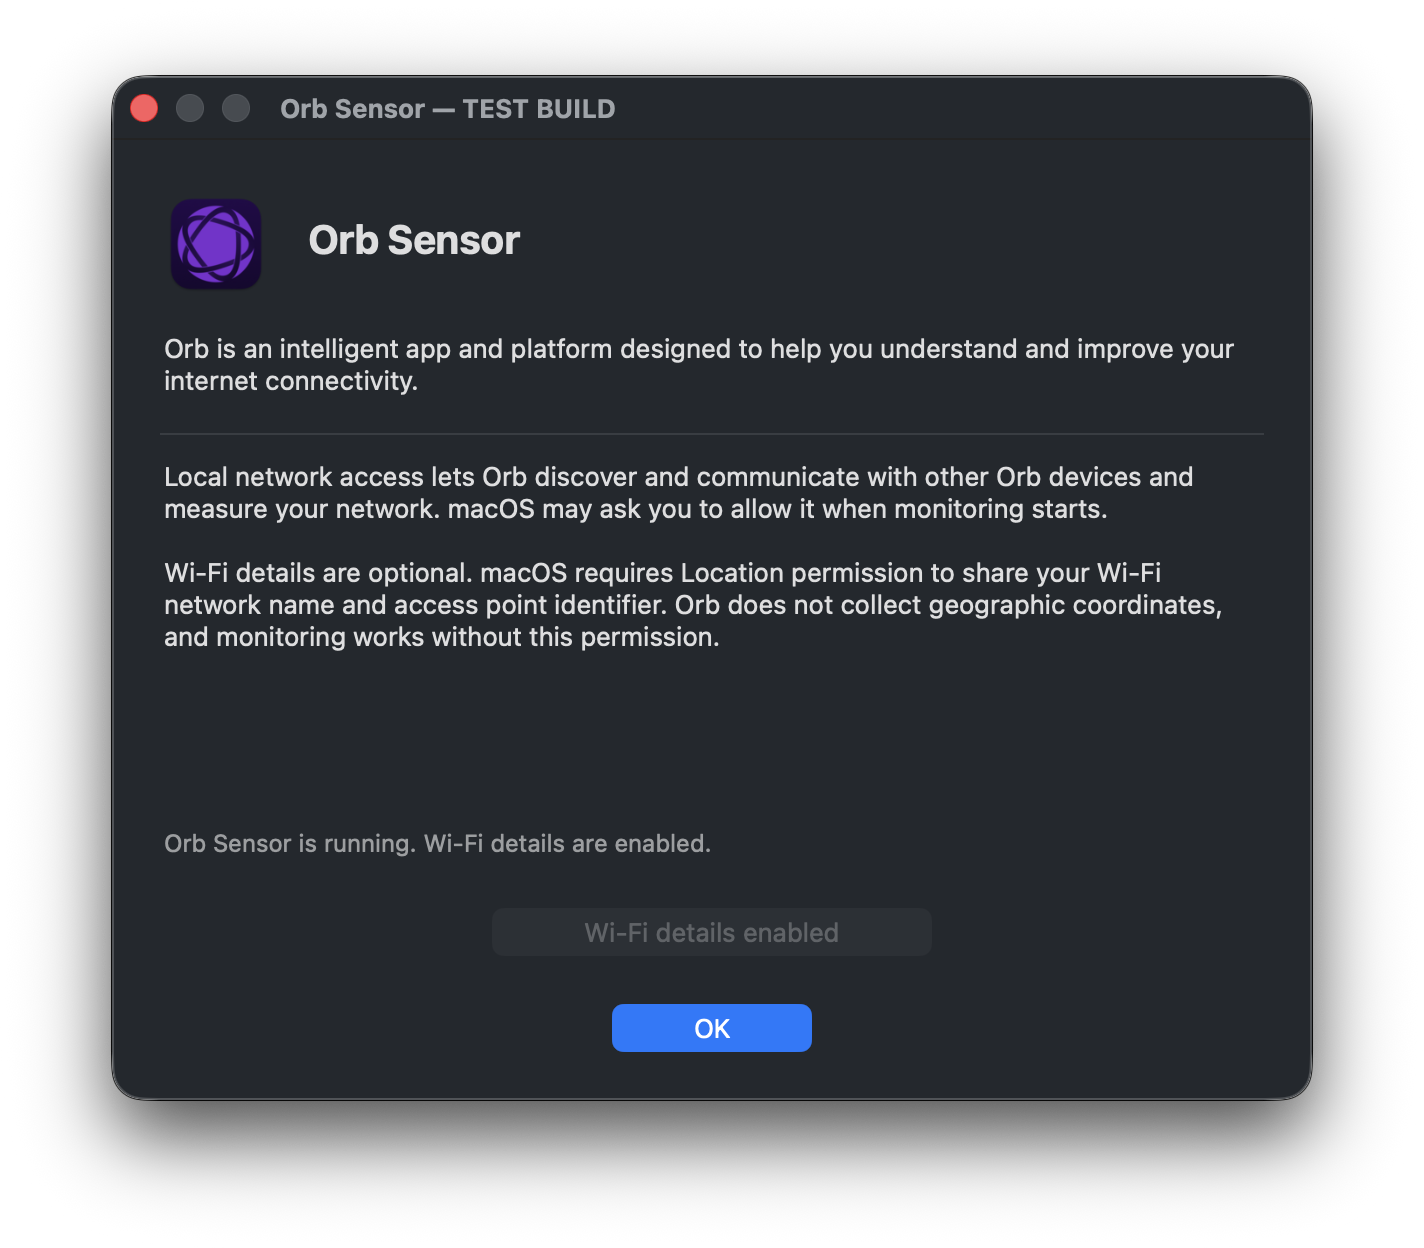
Monitoring itself works either way. Only the Wi-Fi network name and access point identifier depend on this permission, and Orb does not collect geographic coordinates.
Leave both unset, or set them explicitly to false, on any deployment where you want per-network detail. Only set them to true if you have accepted losing SSID and BSSID.
Beware when testing this: once a user has granted Location, macOS keeps the grant in /var/db/locationd, keyed by bundle identifier and signature. It survives uninstalling and reinstalling the sensor, and it cannot be cleared from the command line. A Mac that has ever run Orb will therefore report SSID and BSSID even under a configuration that would fail on a fresh machine. Validate this on a Mac that has never run Orb.
The introduction appears as soon as the package installs, not at the next login: the installer loads the sensor into every GUI session already running. On a Mac where someone is working, a window will appear mid-deployment and macOS may prompt for Location on top of it. Tell users to expect it, and that granting Location is what allows Orb to report which Wi-Fi network they are on.
Upload the profile to Intune
Sign in to the Microsoft Intune admin center.
Go to Devices → macOS → Configuration, and select Create → New Policy.
Set Profile type to Templates, choose Custom, and select Create.
Give the profile a name, for example
Orb Sensor Configuration, then select Next.Set Custom configuration profile name to
Orb Sensor Configuration, leave Deployment channel set to Device channel, uploadorb-sensor.mobileconfig, and select Next.Intune shows the payload it parsed, which is the quickest way to confirm the profile is the
net.orb.orbtype the sensor reads.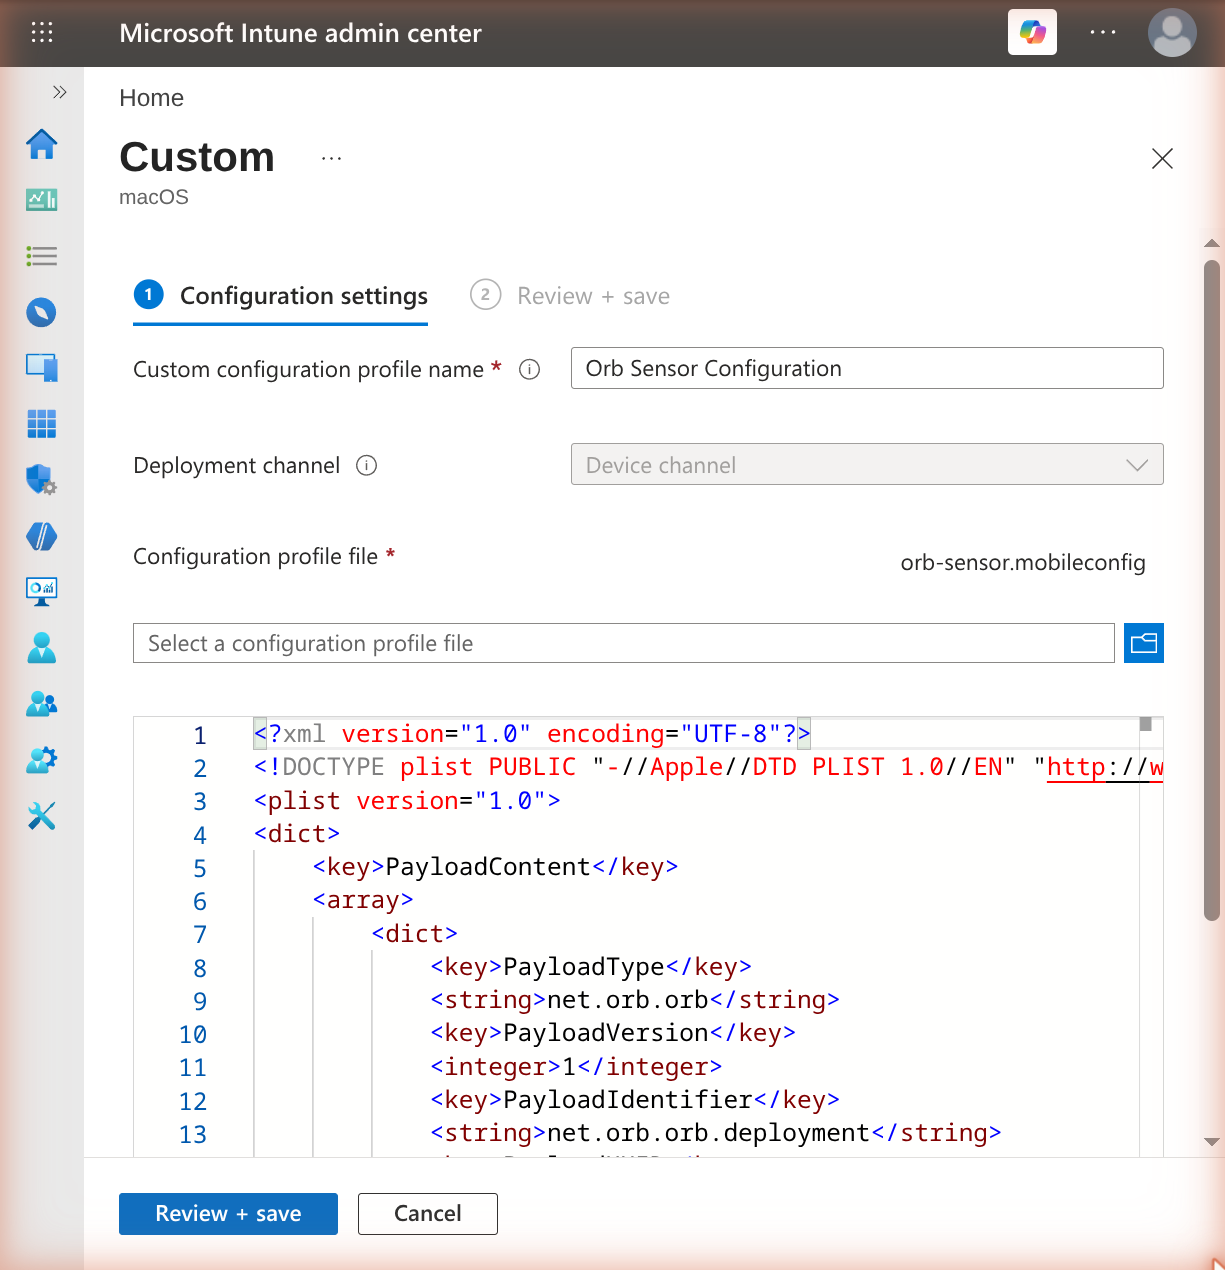
On Assignments, add the device group you will deploy the sensor to, then select Next.
Review and select Create.
Allow the sensor's background item
On macOS 13 and later, a newly installed LaunchAgent shows the user a Background Items Added notification, and the user can disable it in System Settings → General → Login Items & Extensions. A disabled agent stops the sensor from reporting, and the package deliberately does not re-enable an agent an administrator or user has turned off.
Deploy a second custom profile containing a Service Management payload so the agent is managed, always enabled, and not user-removable. Save this as orb-sensor-loginitem.mobileconfig, replacing the two UUIDs as before:
<?xml version="1.0" encoding="UTF-8"?>
<!DOCTYPE plist PUBLIC "-//Apple//DTD PLIST 1.0//EN" "http://www.apple.com/DTDs/PropertyList-1.0.dtd">
<plist version="1.0">
<dict>
    <key>PayloadContent</key>
    <array>
        <dict>
            <key>PayloadType</key>
            <string>com.apple.servicemanagement</string>
            <key>PayloadVersion</key>
            <integer>1</integer>
            <key>PayloadIdentifier</key>
            <string>net.orb.orb.loginitems</string>
            <key>PayloadUUID</key>
            <string>REPLACE-WITH-UUID-3</string>
            <key>PayloadDisplayName</key>
            <string>Orb Sensor Login Item</string>
            <key>PayloadOrganization</key>
            <string>Your Organization</string>
            <key>Rules</key>
            <array>
                <dict>
                    <key>RuleType</key>
                    <string>TeamIdentifier</string>
                    <key>RuleValue</key>
                    <string>YL5R46QP4A</string>
                </dict>
            </array>
        </dict>
    </array>
    <key>PayloadDisplayName</key>
    <string>Orb Sensor Login Item</string>
    <key>PayloadIdentifier</key>
    <string>net.orb.orb.loginitems.configuration</string>
    <key>PayloadOrganization</key>
    <string>Your Organization</string>
    <key>PayloadRemovalDisallowed</key>
    <false/>
    <key>PayloadType</key>
    <string>Configuration</string>
    <key>PayloadUUID</key>
    <string>REPLACE-WITH-UUID-4</string>
    <key>PayloadVersion</key>
    <integer>1</integer>
    <key>PayloadScope</key>
    <string>System</string>
</dict>
</plist>
Upload it the same way as the configuration profile above, and assign it to the same group.
The rule above allows every background item signed by Orb Forge Inc. To allow only the sensor, use a RuleType of Label with a RuleValue of net.orb.sensor.
Add the sensor package
Go to Apps → macOS → macOS apps, and select Create.
Set App type to macOS app (PKG), and select Select.
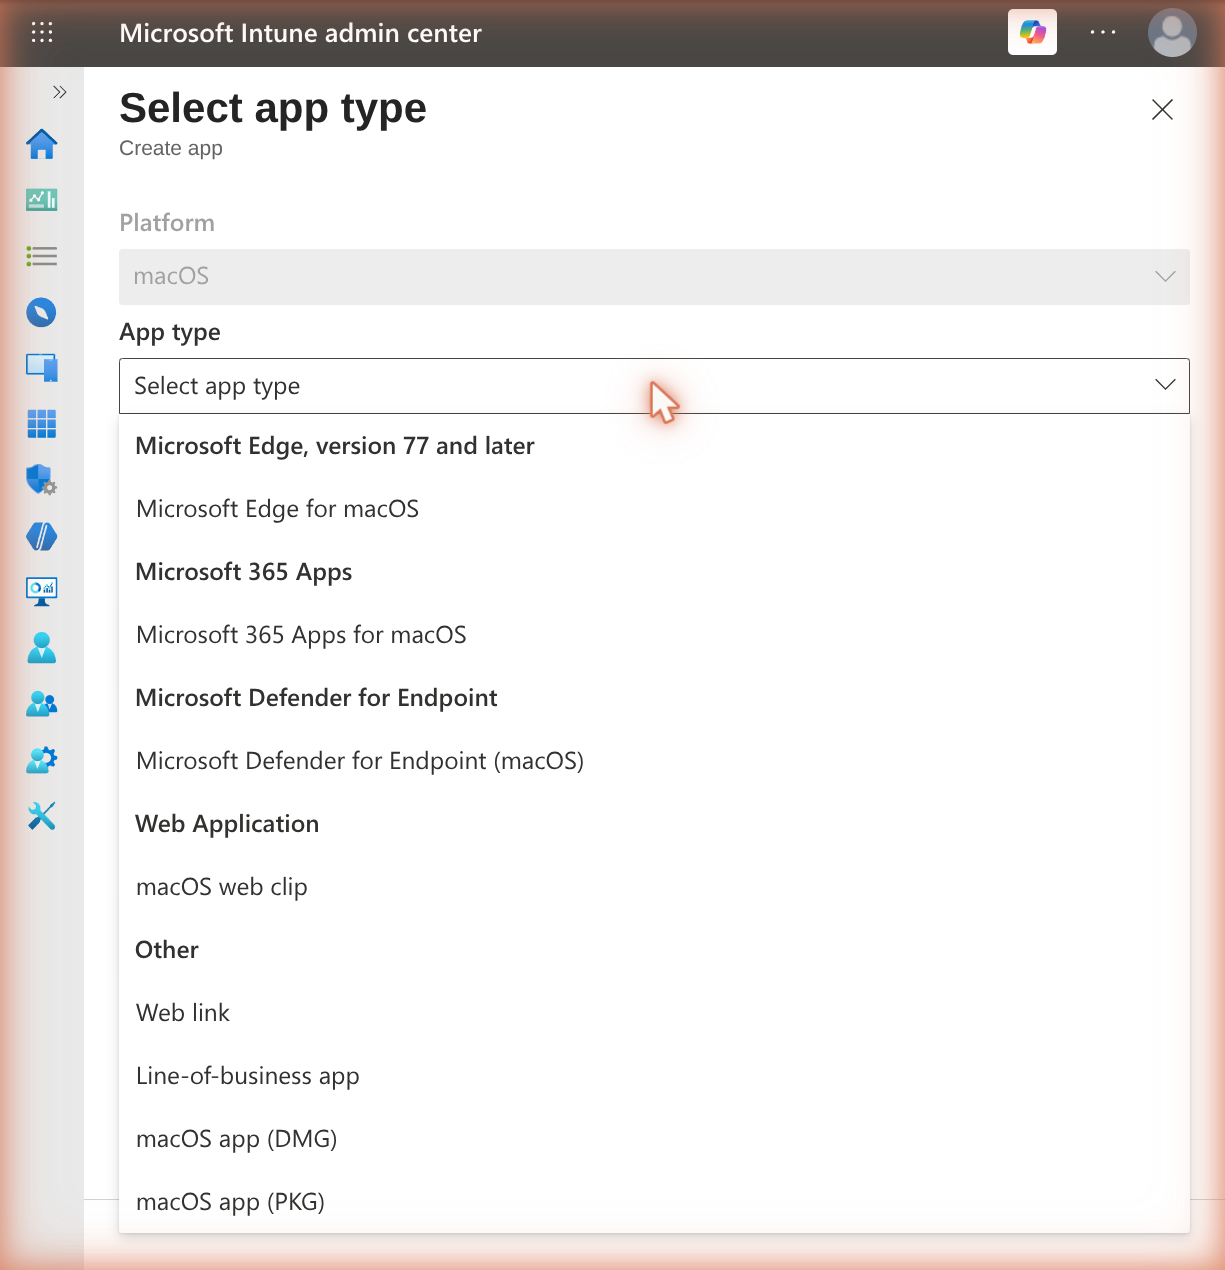
On App information, select Select app package file, upload the sensor
.pkg, and select OK.Intune reads the package and reports its name, platform and size before you confirm.
Correct the metadata, then select Next.
Intune pre-fills Name and Description with the package filename, which is not what you want users or reports to see. Replace Name with
Orb Sensorand write a real description. Publisher is required and is left empty — set it toOrb Forge Inc.On Program, leave both the pre-install and post-install script boxes empty. The package runs its own pre- and post-install scripts, which create the launchd jobs, the log directory and the CLI symlink. Select Next.
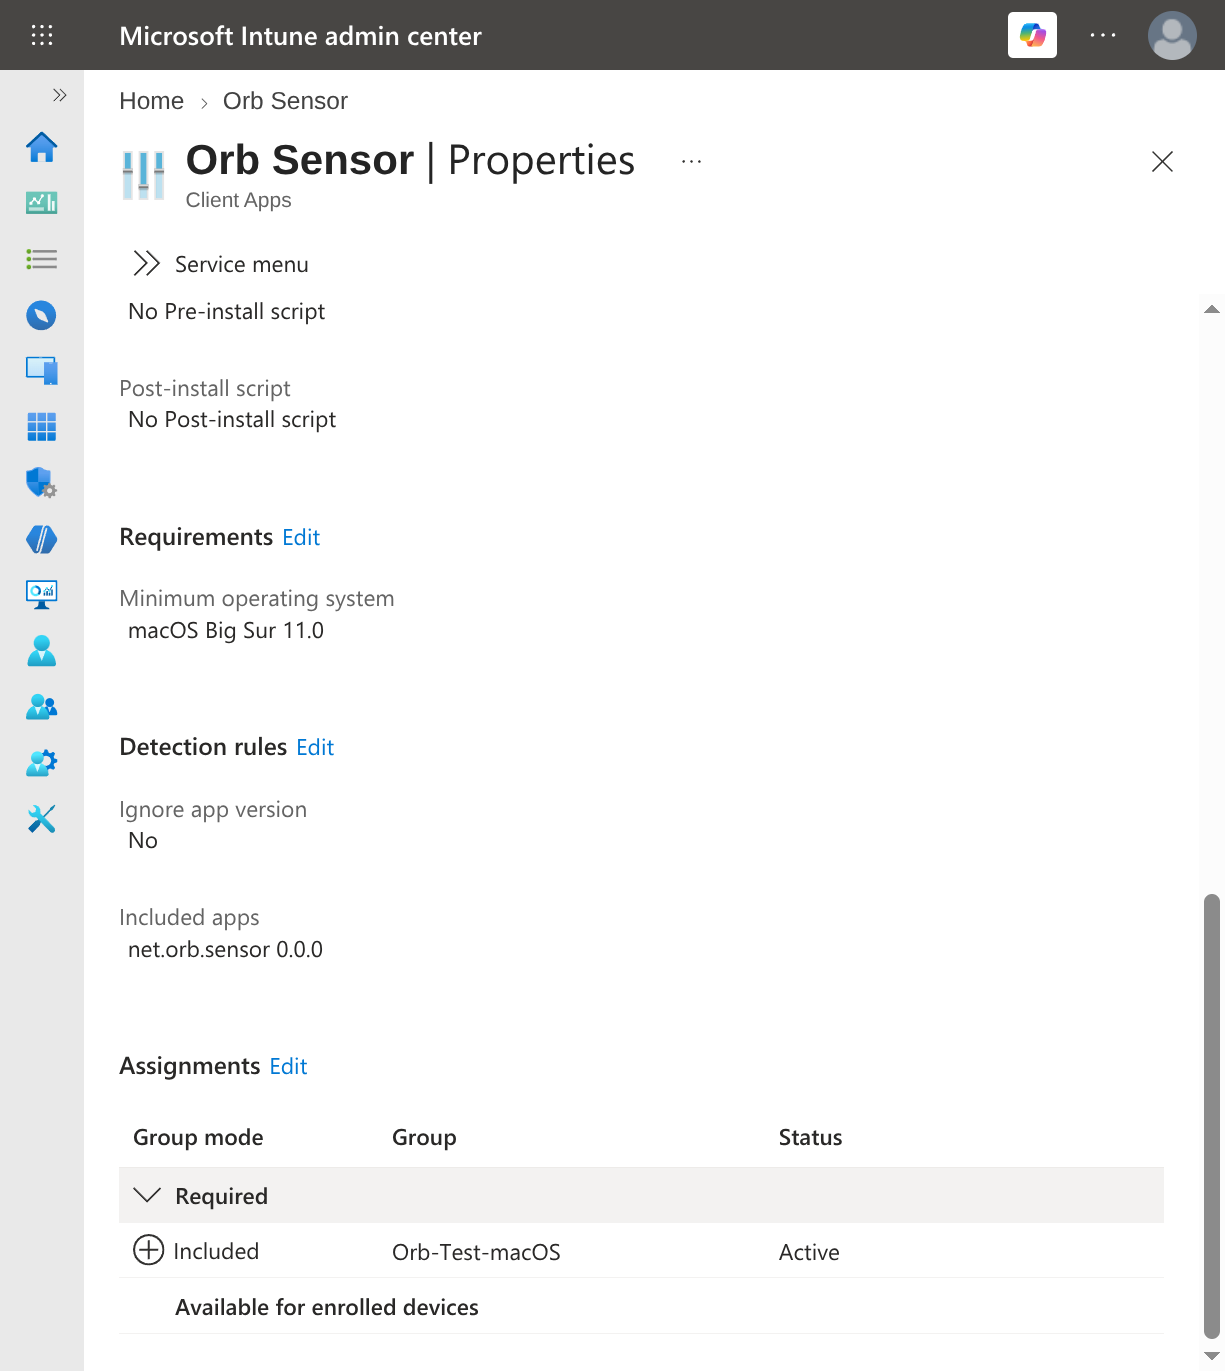
On Requirements, set Minimum operating system to macOS Big Sur 11.0, then select Next.
On Detection rules, confirm the included app Intune read from the package is
net.orb.sensor, with the version you are deploying.Set Ignore app version to match how you manage updates. It defaults to Yes.
Setting Use when No Intune owns the version. Intune reinstalls whenever the installed version differs from the package. Pair this with disabling the sensor's own updater — see Control updates. Yes The sensor self-updates. Intune installs it once and stops checking the version. WarningDo not set Ignore app version to No while the sensor's own updater is still enabled. The updater moves the Mac to a newer version, Intune sees a version that no longer matches the package, and reinstalls the older one — the two fight each other indefinitely.
:::
8. On Assignments, add your device group under Required, then select Next.
9. Review and select Create.The app's Properties page afterwards shows the minimum operating system, the detection rule and the assignment together, which is the quickest way to confirm the deployment is configured as intended:
Verify the deployment
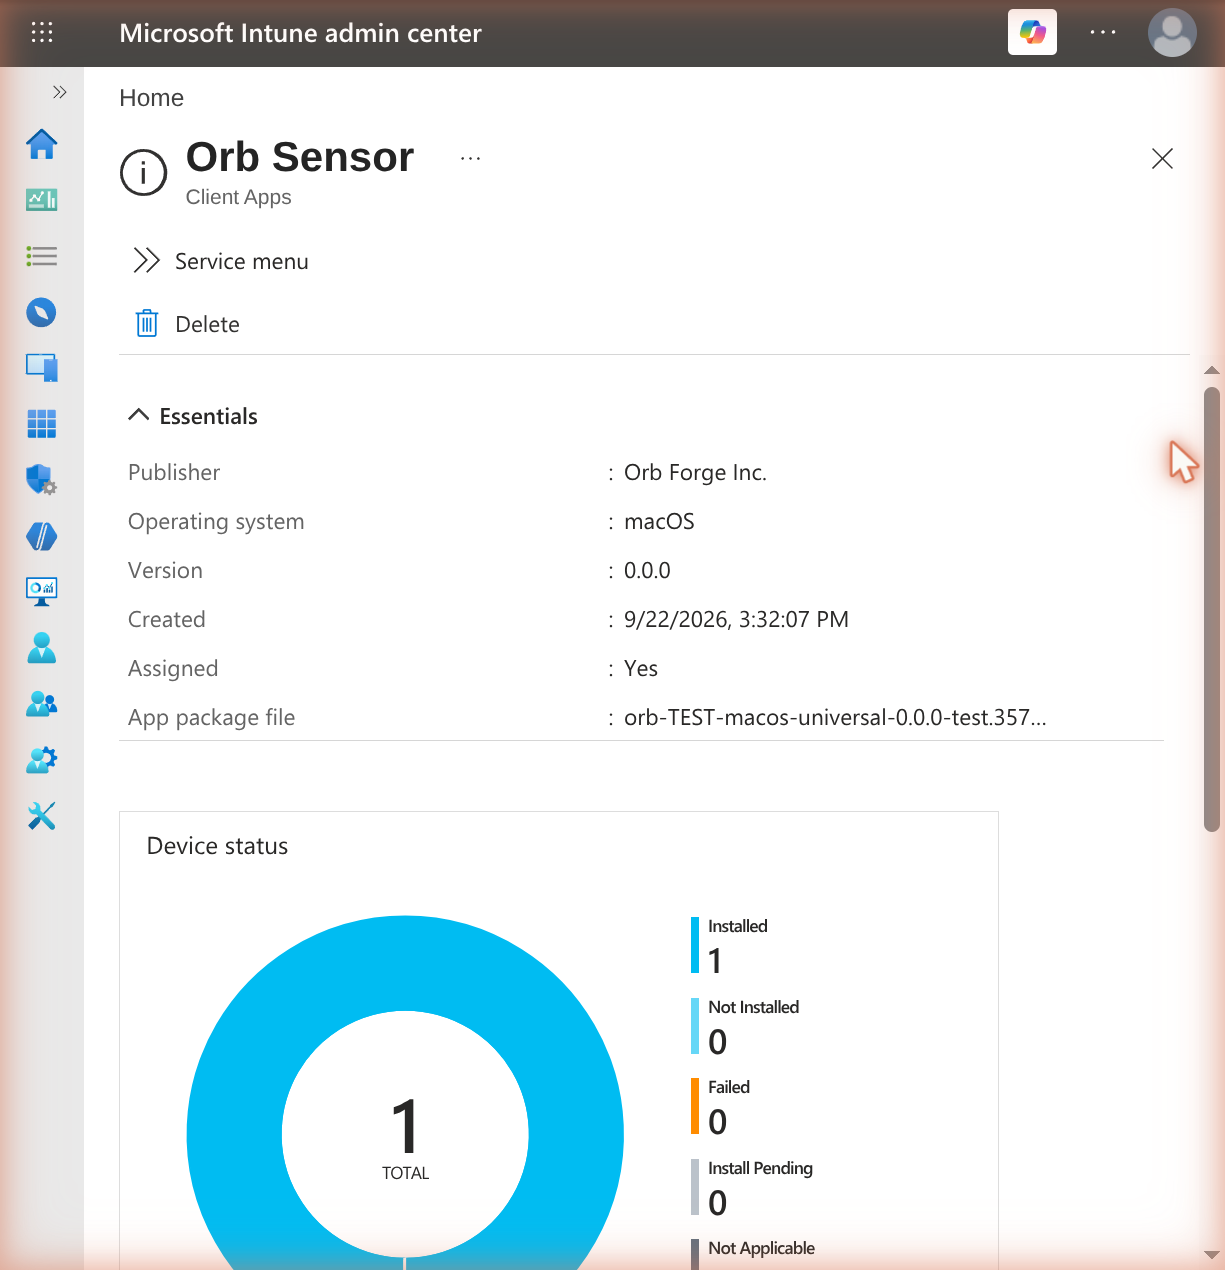
In the admin center, open the app and review Overview and Device install status.
Once a Mac has installed the sensor, the app's Overview reports it:
To make a Mac check in immediately rather than waiting for its next cycle, use Sync on the device in the admin center. This is the more reliable lever: it drives the MDM channel, which delivers configuration profiles within seconds. Company Portal → Devices → ⋯ → Check status on the Mac does the same thing from the device side.
NoteApps and profiles arrive by different routes. Configuration profiles come over MDM and land almost immediately after a sync. Apps are delivered by the Microsoft Intune Agent, which polls on its own schedule and a sync does not drive that loop. A Mac that has its profiles but not the sensor is usually waiting on the agent, not broken.
On a target Mac:
# The package is installed
pkgutil --pkg-info net.orb.orbcli

# The managed preferences arrived, including the token
sudo plutil -p "/Library/Managed Preferences/net.orb.orb.plist"

# The agent is loaded in the logged-in user's session
launchctl print "gui/$(id -u)/net.orb.sensor" | head -20

# The sensor version
/usr/local/bin/orb version

# Recent sensor activity
tail -20 ~/.config/orb/logs/orb_$(date +%Y-%m-%d).log
In Orb Cloud, confirm the Mac appears in your Space and is reporting.
Control updates
Coming soon.
Uninstall the sensor
The package does not include an uninstaller, and Intune does not remove it for you.
WarningA macOS app deployed through the Intune agent is not removed when the device is retired or unenrolled. The sensor, its launchd jobs and its local data stay on the Mac, and it keeps reporting to your Space until it is removed explicitly. Uninstall before retiring a device.
Remove it with a shell script run as root, or as an Intune Uninstall assignment:
#!/bin/bash set -euo pipefail # Stop the updater /bin/launchctl bootout system/net.orb.updater 2>/dev/null || true # Stop the sensor in every logged-in session while read -r uid; do [[ "$uid" =~ ^[0-9]+$ ]] && (( uid > 500 )) || continue /bin/launchctl bootout "gui/$uid/net.orb.sensor" 2>/dev/null || true done < <(/bin/ps -axo uid= | /usr/bin/sort -un) /bin/rm -f /Library/LaunchAgents/net.orb.sensor.plist /bin/rm -f /Library/LaunchDaemons/net.orb.updater.plist /bin/rm -rf "/Applications/Orb Sensor.app" /bin/rm -rf "/Library/Application Support/Orb" /bin/rm -rf /Library/Logs/Orb /bin/rm -f /usr/local/bin/orb /Library/Preferences/net.orb.plist # Per-user state: identity, measurement data and logs. for home in /Users/*; do [[ -d "$home/.config/orb" ]] && /bin/rm -rf "$home/.config/orb" done # Clear any administrator disable overrides, which outlive the job definitions # and would otherwise stop a later installation from starting the sensor. /bin/launchctl enable system/net.orb.updater 2>/dev/null || true /usr/sbin/pkgutil --forget net.orb.orbcli 2>/dev/null || trueWarningRemoving
~/.config/orbdiscards the Orb's identity, so a later installation enrols as a new Orb rather than returning as the same one. Delete the stale entry from your Space, or keep the directory if you want the device to come back as itself.Also remove the configuration profile assignment, so the Deployment Token is withdrawn from the device.
Lastly, login to Orb Cloud, select the Orb, and select "Remove device" to ensure the Orb license is reclaimed.
Files and processes for endpoint security
Use this section to allow-list the Orb sensor in antivirus, EDR and data loss prevention tools. It describes what the package installs and what the sensor writes while it runs.
Code signing
Item Signed by The .pkgDeveloper ID Installer: Orb Forge Inc. (YL5R46QP4A)Orb Sensor.app(bundle IDnet.orb.sensor)Developer ID Application: Orb Forge Inc. (YL5R46QP4A)Allow by Team ID
YL5R46QP4Arather than by file hash, which changes with every release. The same Team ID is what the Service Management profile uses.Processes
Process Runs as When /Applications/Orb Sensor.app/Contents/MacOS/orb-sensor --backgroundThe logged-in user, from the LaunchAgent net.orb.sensorContinuously, in each GUI session. launchd restarts it if it exits abnormally. /bin/bash "/Library/Application Support/Orb/updater.sh"root, from the LaunchDaemonnet.orb.updaterOnce a day, unless the updater is disabled. It calls curl,pkgutil,spctlandinstaller, and only runsinstallerwhen a newer release is available. A disabled updater never runs, and none of these tools are called.Files
Installed by the package, owned by
root:Path Purpose /Applications/Orb Sensor.appThe sensor. /usr/local/bin/orbSymlink to the sensor binary, for use as a command-line tool. Created by the post-install script. /Library/LaunchAgents/net.orb.sensor.plistStarts the sensor in each user's GUI session. /Library/LaunchDaemons/net.orb.updater.plistRuns the updater daily as root./Library/Application Support/Orb/updater.shSelf-updater. It downloads from https://pkgs.orb.net/stable/macos/and installs a release only if its SHA-256 matches, it is signed by the Developer ID Installer identity above, it passes Gatekeeper, and its package ID and version match the release./Library/Application Support/Orb/updater.lockStops two updater runs from overlapping. Created the first time the updater runs, which is a day after installation. /Library/Logs/Orb/updater.log,updater-error.logUpdater output. Configuration, written by macOS or an administrator rather than the package:
Path Purpose Sensitive /Library/Managed Preferences/net.orb.orb.plistWritten by macOS from your configuration profile. Contains your Deployment Token. macOS makes this file readable by every account on the Mac ( 0644, owned byroot).Yes /Library/Preferences/net.orb.plistOptional. Read by the post-install script for installation settings. No Per-user data, in
~/.config/orb. The sensor writes this folder as the logged-in user. The folder is0700and its files are0600, so other accounts on the Mac cannot read it.Path Purpose Sensitive private.keyThe Orb's private key (ECC, PEM). This is the device's identity in Orb Cloud. Yes certificate.crtClient certificate for that key, issued by Orb Intermediate CA. Short-lived and renewed automatically, so expect this file to be rewritten regularly. No deployment_token.txtNot created on an Intune deployment, which delivers the token through managed preferences. The sensor reads it if someone creates it by hand. Yes remoteconfig.jsonLocal copy of the configuration pushed from Orb Cloud. No orbstore/filestore/Local measurement database. It holds catalog.json, afilestore.lock, and one folder per dataset (for examplescores_1m,responsiveness_1s,wifi_link_1m,speed_results), partitioned by day into.jsonlfiles that are compressed to.jsonl.gz. Written continuously.No spool/Queue for results that are waiting to be sent to Orb Cloud. No logs/orb_YYYY-MM-DD.logDaily sensor log, one JSON object per line. No Each user who logs in gets their own
~/.config/orb, and so their own identity. A Mac shared by several users can therefore appear in your Space once per user.Updater working files:
Path Purpose /private/tmp/net.orb.updater.XXXXXX/Created for each update check, readable only by root. Holds the downloaded package and its checksum. Removed when the run ends.Recommendations
- Treat
private.keyand the managed preferences file as secrets. Anyone who has them can impersonate this Orb, or link a device to your Space. Keep them out of backups and support bundles that leave the device, and rotate the token in Orchestration if it leaks. - Exclude
~/.config/orb/orbstorefrom real-time scanning if scanning causes high CPU. The sensor writes many small files there continuously. Leave the rest of~/.config/orbmonitored. - Do not quarantine or block
updater.shwhile the sensor updates itself. A blocked updater leaves the Mac on its installed version and logs a failure every day.
Troubleshooting
The Mac does not appear in my Space
Confirm the managed preferences arrived and contain your token:
sudo plutil -p "/Library/Managed Preferences/net.orb.orb.plist"If the file is missing, the configuration profile has not installed — check its assignment in Intune and the device's profile list under System Settings → General → Device Management. If the token is present but the device still does not appear, confirm the token is still valid in Orchestration and that the Mac can reach the internet.
The sensor is installed but not running
The sensor only runs in a logged-in GUI session. Confirm a user is logged in, then check the agent:
launchctl print "gui/$(id -u)/net.orb.sensor"
launchctl print-disabled "gui/$(id -u)" | grep net.orb.sensor
If it reports as disabled, the user turned it off in Login Items & Extensions. Deploy the Service Management profile described above so the item is managed and cannot be disabled.
Installation fails
Check the Intune agent logs on the device:
sudo tail -100 /Library/Logs/Microsoft/Intune/*.logThe package refuses to install and reports the reason if it finds a symlink, or a group- or world-writable directory, at any of the privileged paths it owns, or if it is targeted at a volume other than the startup volume.
- Treat