
Converting a GL.iNet Brume 2 into a Standalone Orb
Introduction
The GL.iNet Brume 2 (GL-MT2500 and GL-MT2500A) is a VPN Gateway - essentially a well-equipped tiny computer that's perfect for running as a standalone Orb device!
This guide will walk you through flashing a new firmware image with Orb pre-installed, which will allow you to plug the Brume 2 into an open Ethernet port on your router, a network switch, or a mesh unit to continuously monitor your network. If you already have a Brume 2 set up as a VPN Gateway, router, or Pi-hole and wish to retain the stock firmware, a separate guide for that option is coming soon.
Equipment Needed
Before you begin, make sure you have:
- GL.iNet Brume 2 (model GL-MT2500 or GL-MT2500A)
- 2 Ethernet cables (note: the Brume 2 comes with one)
- An open Ethernet port on your home router or network switch
- A personal computer with an Ethernet port (or with a USB Ethernet adapter)
- Power supply for the Brume 2 (included with the device)
Step 1: Create your OpenWRT Image
The Brume 2 ships with the OpenWRT operating system, which is pre-configured with many features to act as a router, VPN gateway, and more. For this guide, we'll create a new OpenWRT image that installs the Orb sensor and configures the device to connect to your network as a monitoring device.
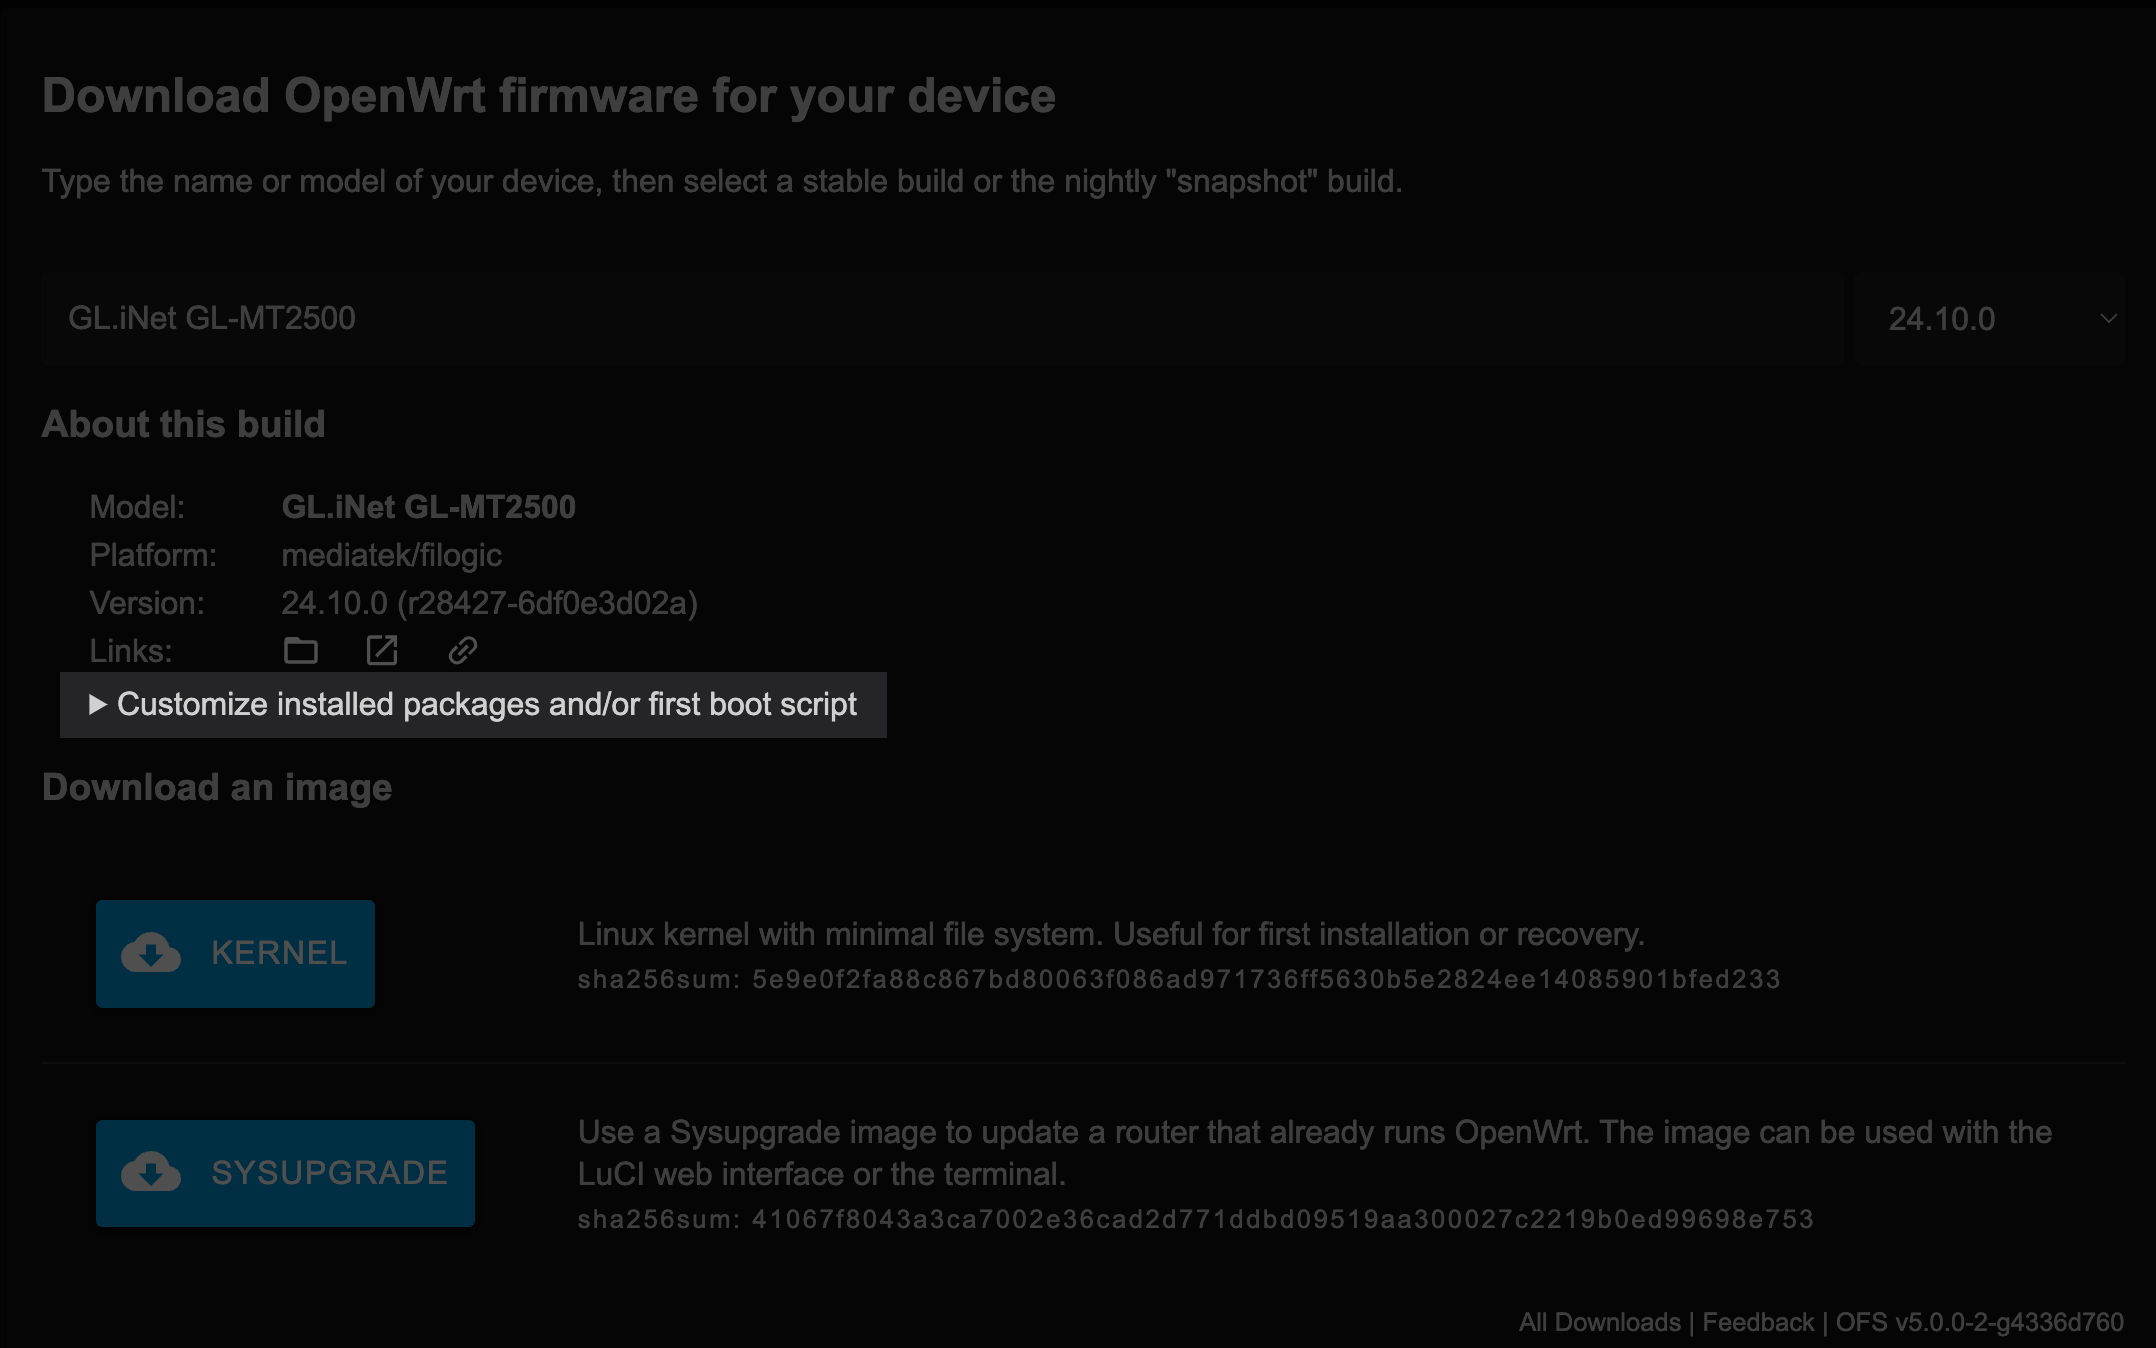
- Visit the OpenWRT Firmware Selector for the Brume 2 GL-MT2500
- Click "Customize installed packages and/or first boot script" to expand the customization options
- In the "Installed Packages" text box, replace the contents with the following code exactly as shown:
base-files ca-bundle dropbear firewall4 fitblk fstools kmod-crypto-hw-safexcel kmod-gpio-button-hotplug kmod-leds-gpio kmod-nft-offload kmod-phy-aquantia libc libgcc libustream-mbedtls logd mtd netifd nftables odhcp6c odhcpd-ipv6only opkg ppp ppp-mod-pppoe procd-ujail uboot-envtools uci uclient-fetch urandom-seed urngd wpad-basic-mbedtls -wpad-basic-mbedtls e2fsprogs f2fsck mkf2fs kmod-usb3 luci avahi-daemon chrony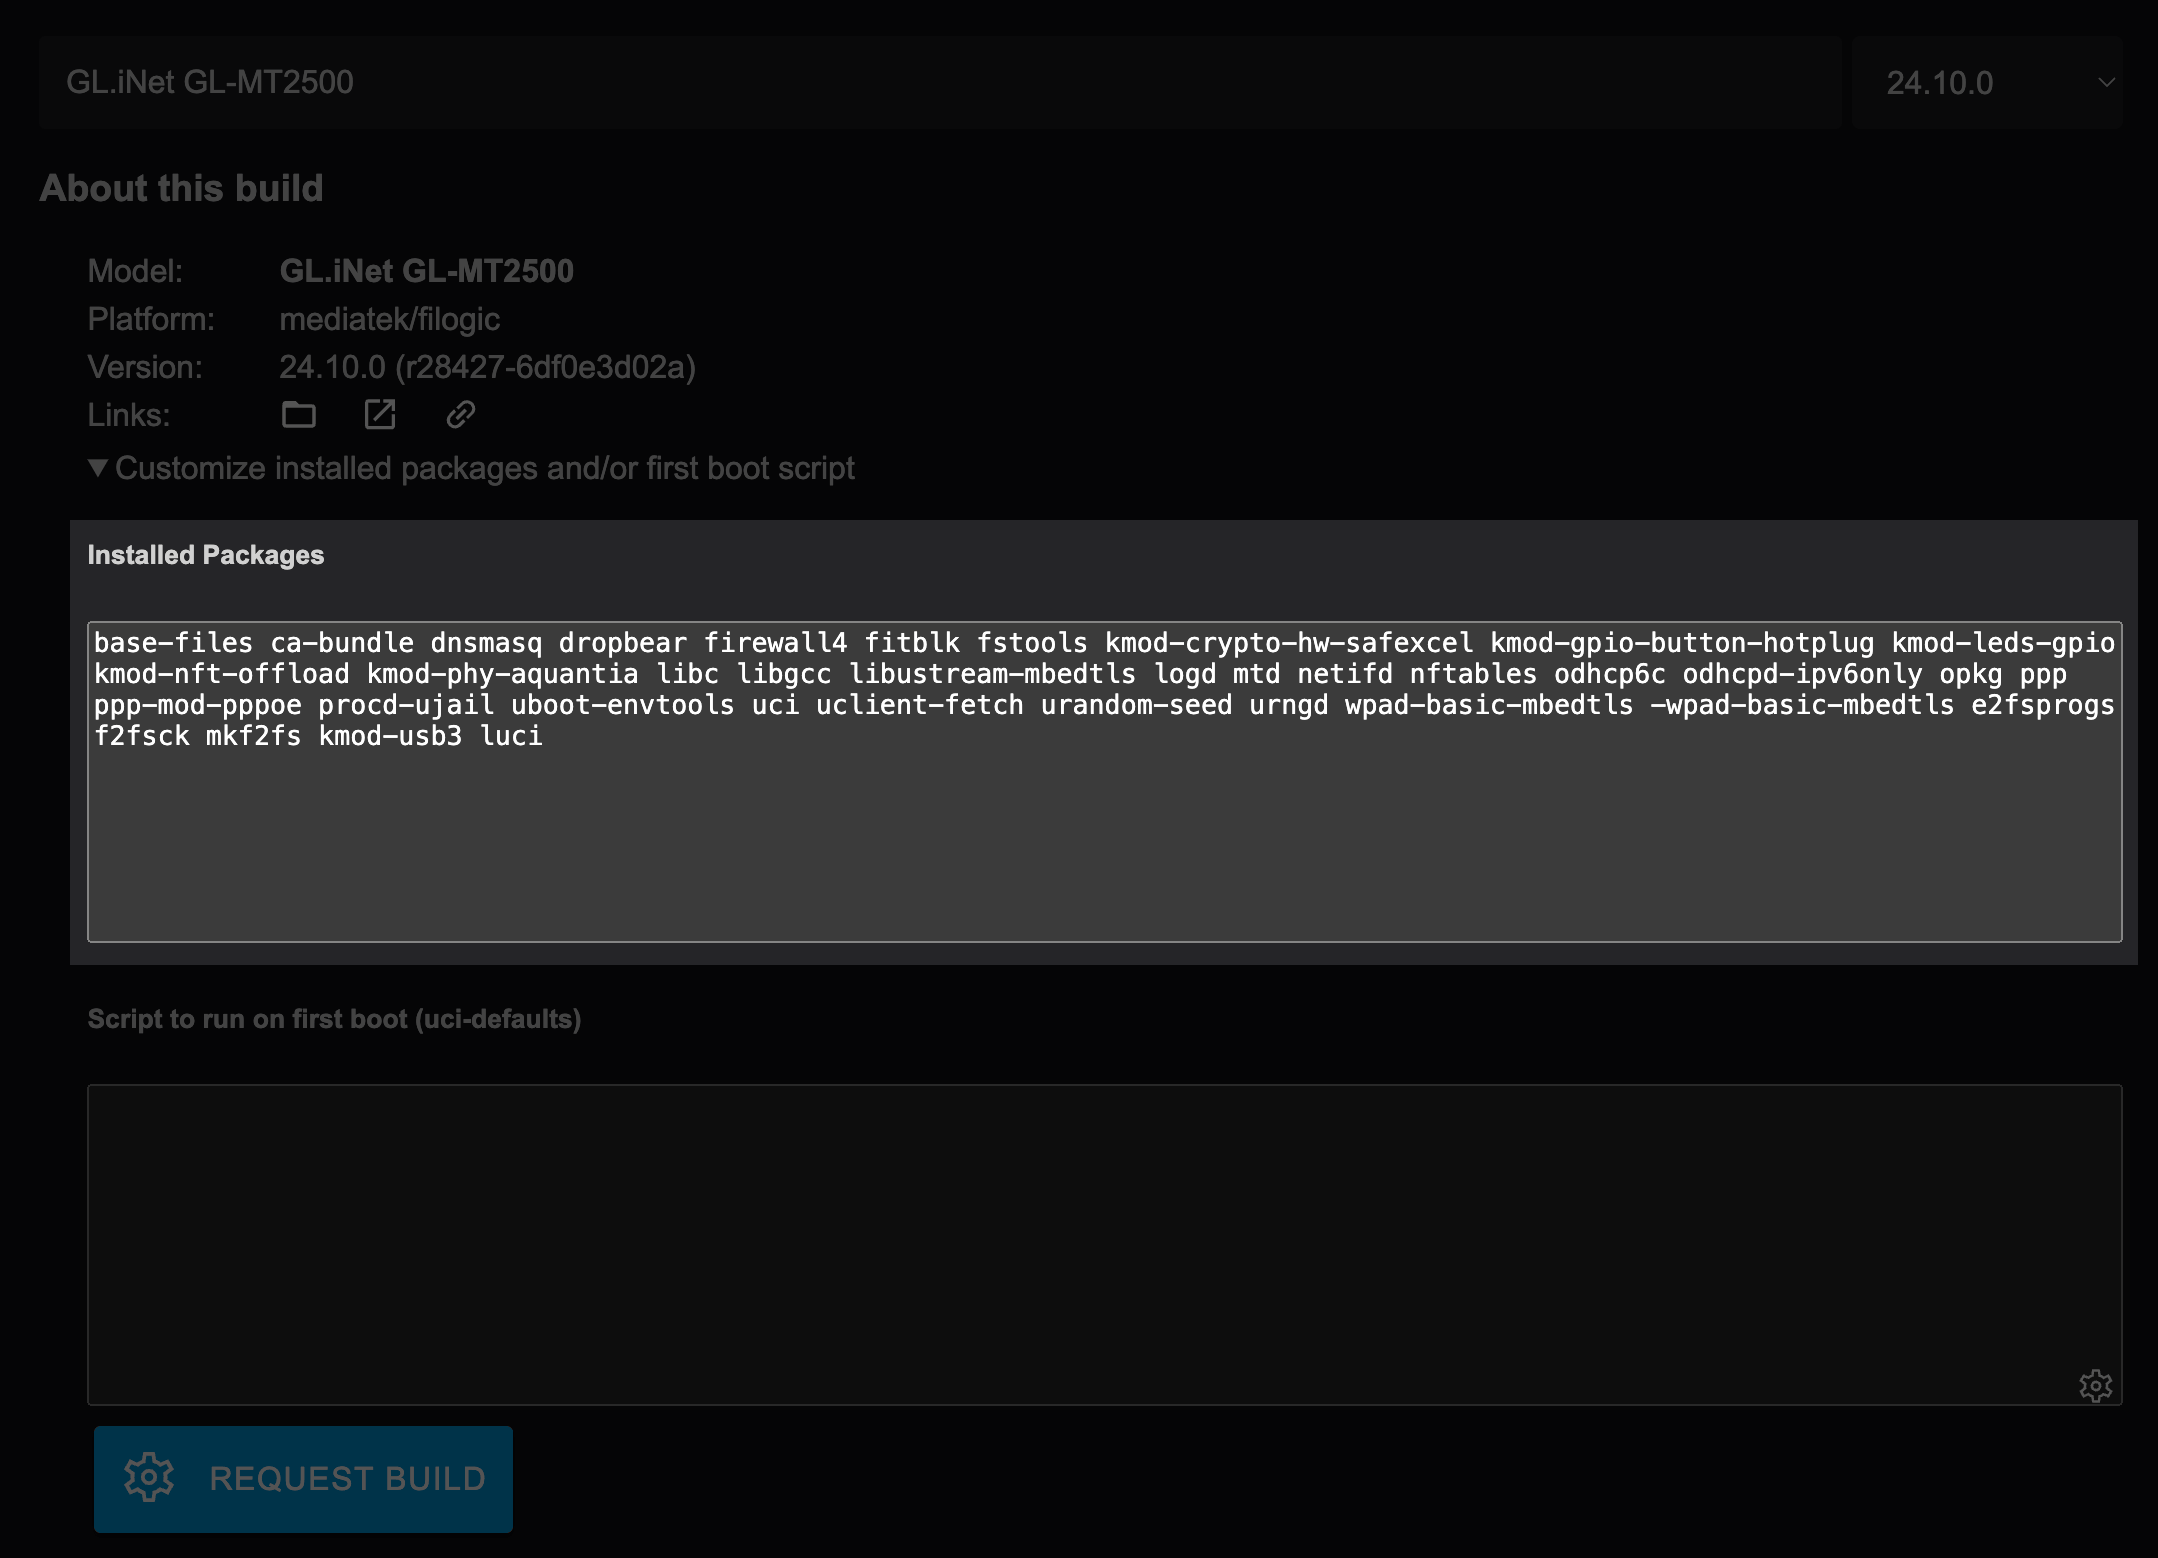
- In the "Script to run on first boot (uci-defaults)" text box, paste in the following code exactly as shown:
#!/bin/sh

ARCHITECTURE=$(opkg info busybox | grep "Architecture" | awk '{print $2}')
URL="https://pkgs.orb.net/stable/openwrt/$ARCHITECTURE"
KEY_URL="https://pkgs.orb.net/stable/openwrt/key.pub"
KEY_PATH="/etc/opkg/keys/744a82bfef3c5690"
ORB_BINARY="/usr/bin/orb"

# Set hostname
RAND_NUM=$(echo $((RANDOM % 10000)))
uci set system.@system[0].hostname="Orb-$RAND_NUM"
uci commit system

# Create bridge interface for LAN and WAN
uci set network.lan.device='br-lan'
uci set network.lan.proto='dhcp'

# Configure bridge device
uci set network.@device[0]=device
uci set network.@device[0].name='br-lan'
uci set network.@device[0].type='bridge'
uci set network.@device[0].ports='eth0 eth1'
uci commit network

# Disable WAN interface
uci delete network.wan
uci delete network.wan6
uci commit network

# Restart network to apply changes
/etc/init.d/network restart
/etc/init.d/sysntpd restart

mkdir /overlay/orb
mkdir /.config
ln -s /overlay/orb /.config/orb

echo "src/gz orb_packages $URL"  | tee -a /etc/opkg/customfeeds.conf

# Optional: Customize Orb configuration before first launch
# You can set a deployment token to automatically link this Orb to your Orb Space, or adjust other settings.
# See the https://orb.net/docs/deploy-and-configure/configuration for all available options.
#
# cat << EOF > /etc/config/orb
# config orb 'orb'
# 	list env 'ORB_DATA_DIR=/root'
# 	list env 'ORB_EPHEMERAL_MODE=1'
# 	list env 'ORB_LOG_CONSOLE_FORMAT=syslog'
# 	list env 'ORB_DEPLOYMENT_TOKEN=<YOUR-DEPLOYMENT-TOKEN-HERE>'
# EOF

# Create orb-setup service
cat << EOF > /etc/init.d/orb-setup
#!/bin/sh /etc/rc.common
START=99
BOOT=99

start() {
	logger -t "orb-setup" "Starting orb setup..."

	(
		while [ ! -f "$ORB_BINARY" ]; do
			logger -t "orb-setup" "Checking for orb binary..."

			while [ ! -f "$KEY_PATH" ]; do
				logger -t "orb-setup" "Key file not found, attempting to download..."

				# Try to download the key, suppress output
				if wget -q -O "$KEY_PATH" "$KEY_URL"; then
					logger -t "orb-setup" "Key downloaded successfully!"
				else
					logger -t "orb-setup" "Download failed, retrying in 10 seconds..."
					sleep 10
					continue
				fi
			done

			/bin/opkg update | logger -t "orb-setup"
			/bin/opkg install orb | logger -t "orb-setup"

			# If the orb binary is still not found, wait for 10 seconds and check again
			logger -t "orb-setup" "orb binary not found, checking again in 10 seconds..."
			sleep 10
		done

		logger -t "orb-setup" "orb binary found. Proceeding..."
		/usr/bin/orb-update install
		logger -t "orb-setup" "Installation successful, disabling script."
		/etc/init.d/orb-setup disable

	) &
}
EOF

chmod +x /etc/init.d/orb-setup
/etc/init.d/orb-setup enable
/etc/init.d/orb-setup start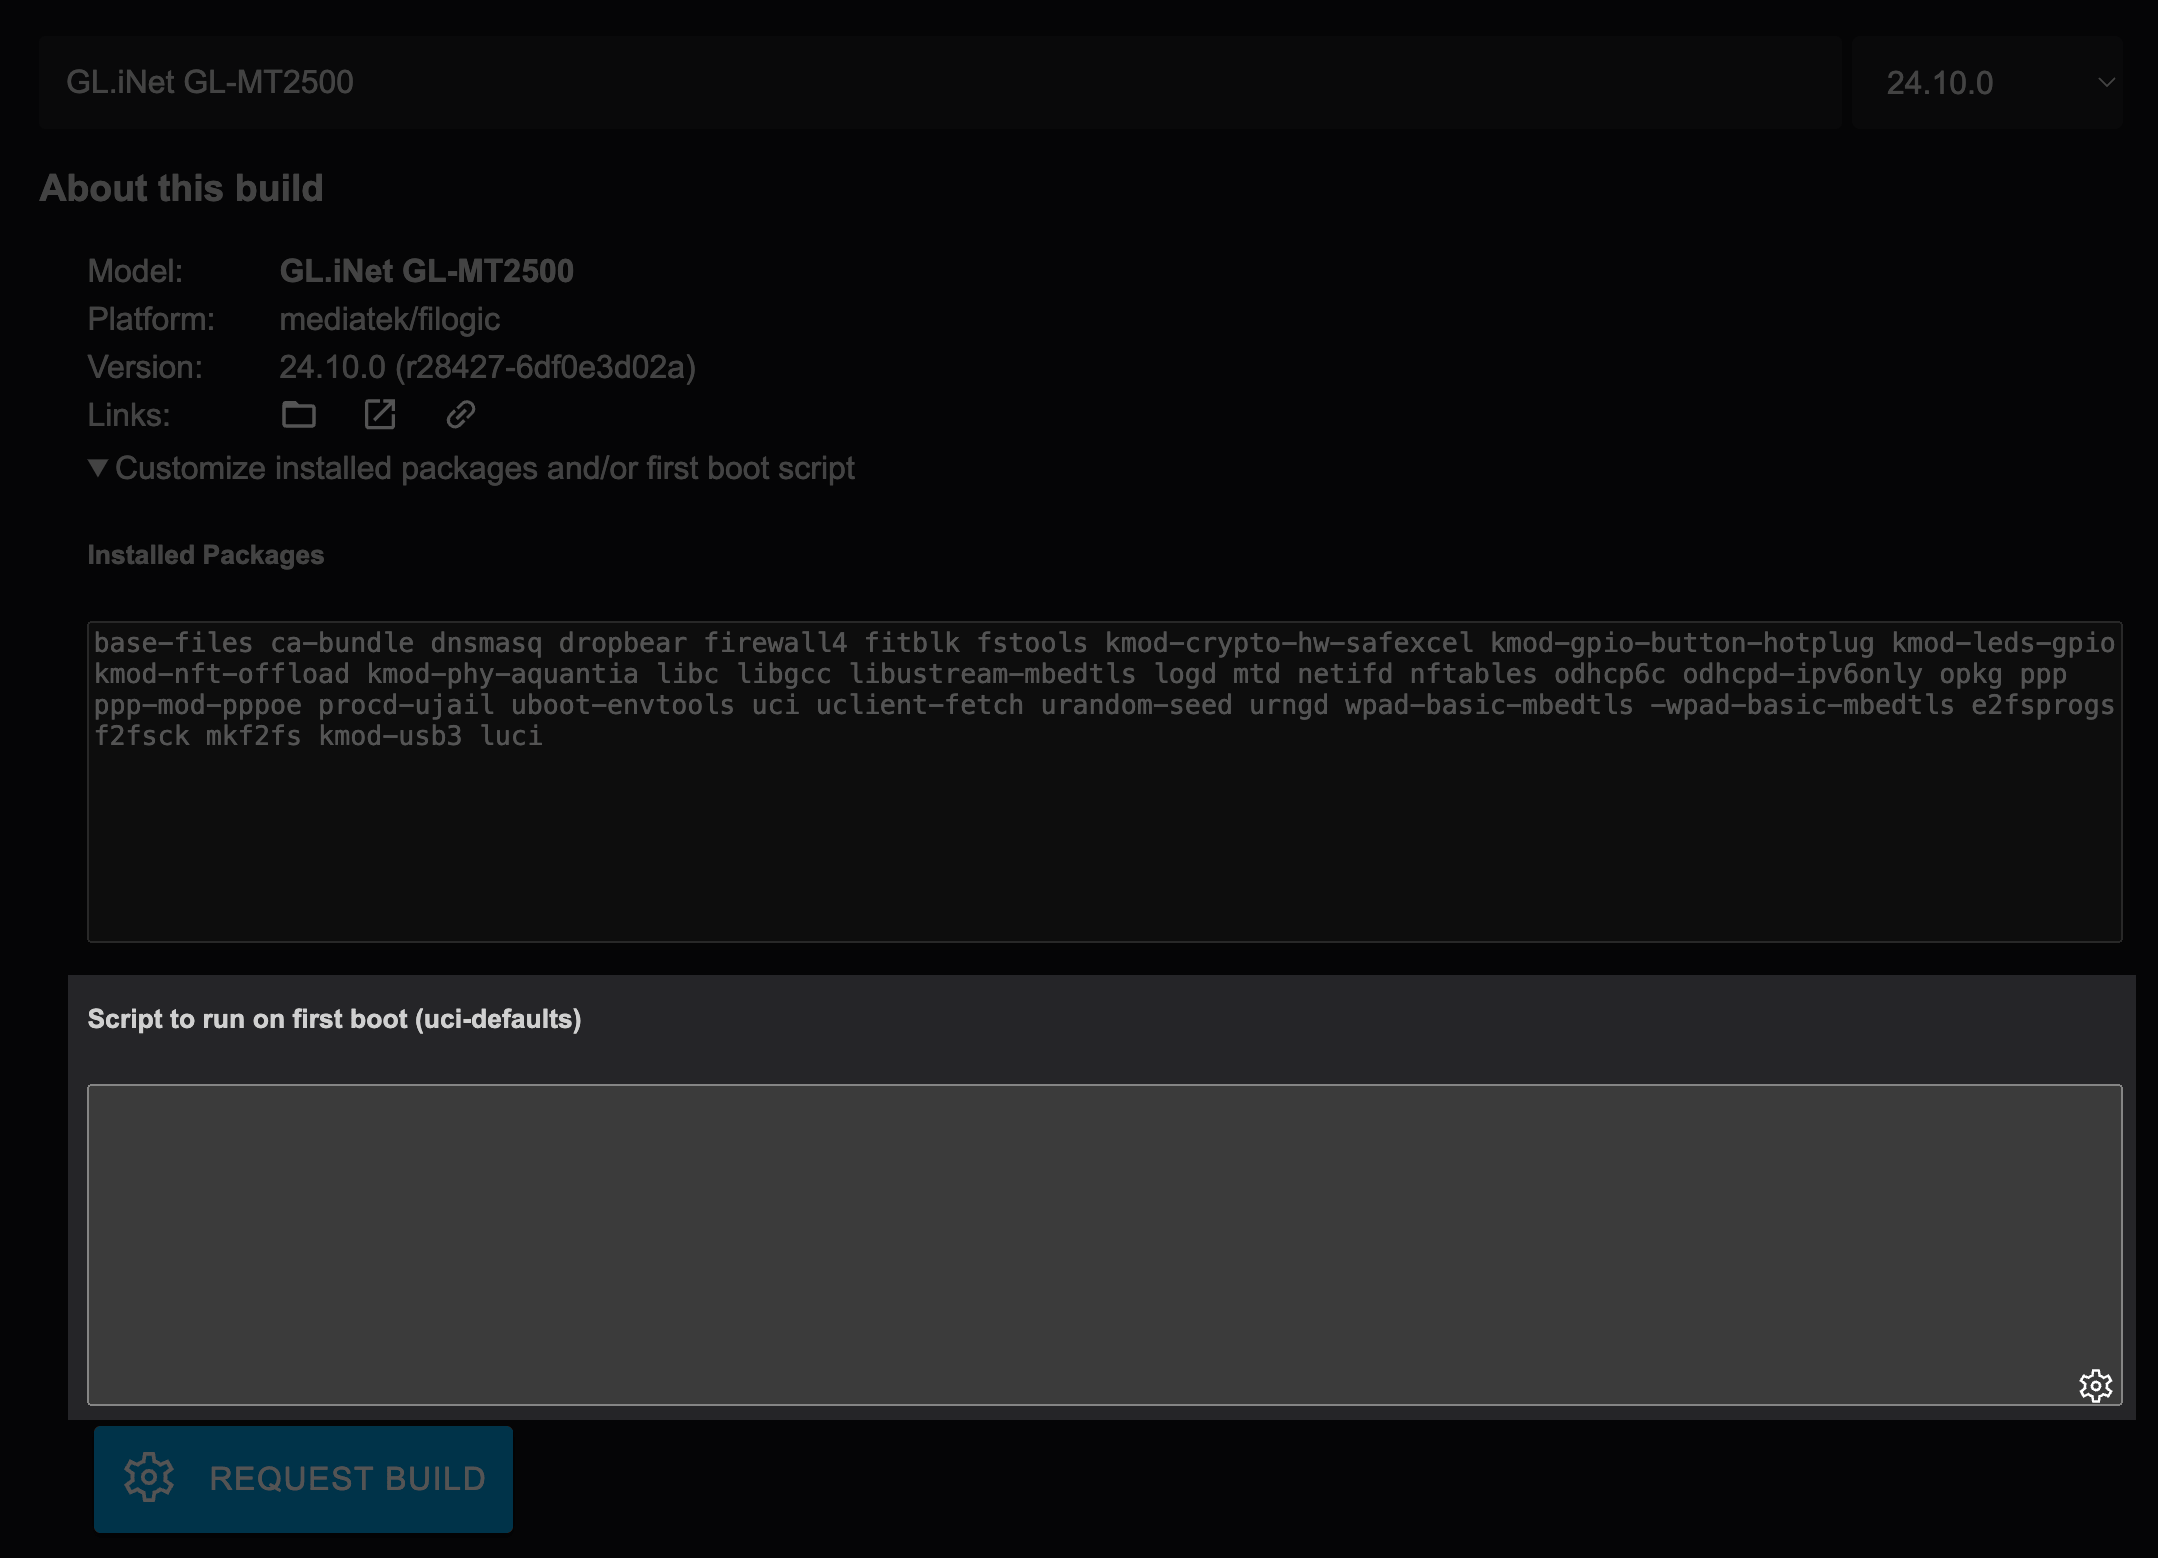
- Click the "REQUEST BUILD" button
- Wait for the build process to complete. Once a green box with "Build successful" appears, click the "SYSUPGRADE" button
- Download the .bin file to your computer. Remember where you saved it as you'll need it in Step 3
Step 2: Connect the Brume 2 to your network and computer
Now we'll set up the physical connections for your Brume 2:
- Identify the ports on your Brume 2. The device has two Ethernet ports labeled "WAN" and "LAN"
- Plug one Ethernet cable into an open port on your home network router or switch
- Connect the other end of this cable to the WAN port on the Brume 2
- Plug a second Ethernet cable into your computer's Ethernet port (or USB Ethernet adapter)
- Connect the other end of this cable to the LAN port on the Brume 2
- Connect the USB-C power adapter (included with your Brume 2) to the device
- Plug the power adapter into a wall outlet or power strip
- Wait for the light on the Brume 2 to stabilize (stop blinking rapidly), which indicates it's ready
- On your computer, open a web browser and visit http://192.168.8.1
Step 3: Flash the image
Now we'll install the custom OpenWRT image with Orb pre-installed:
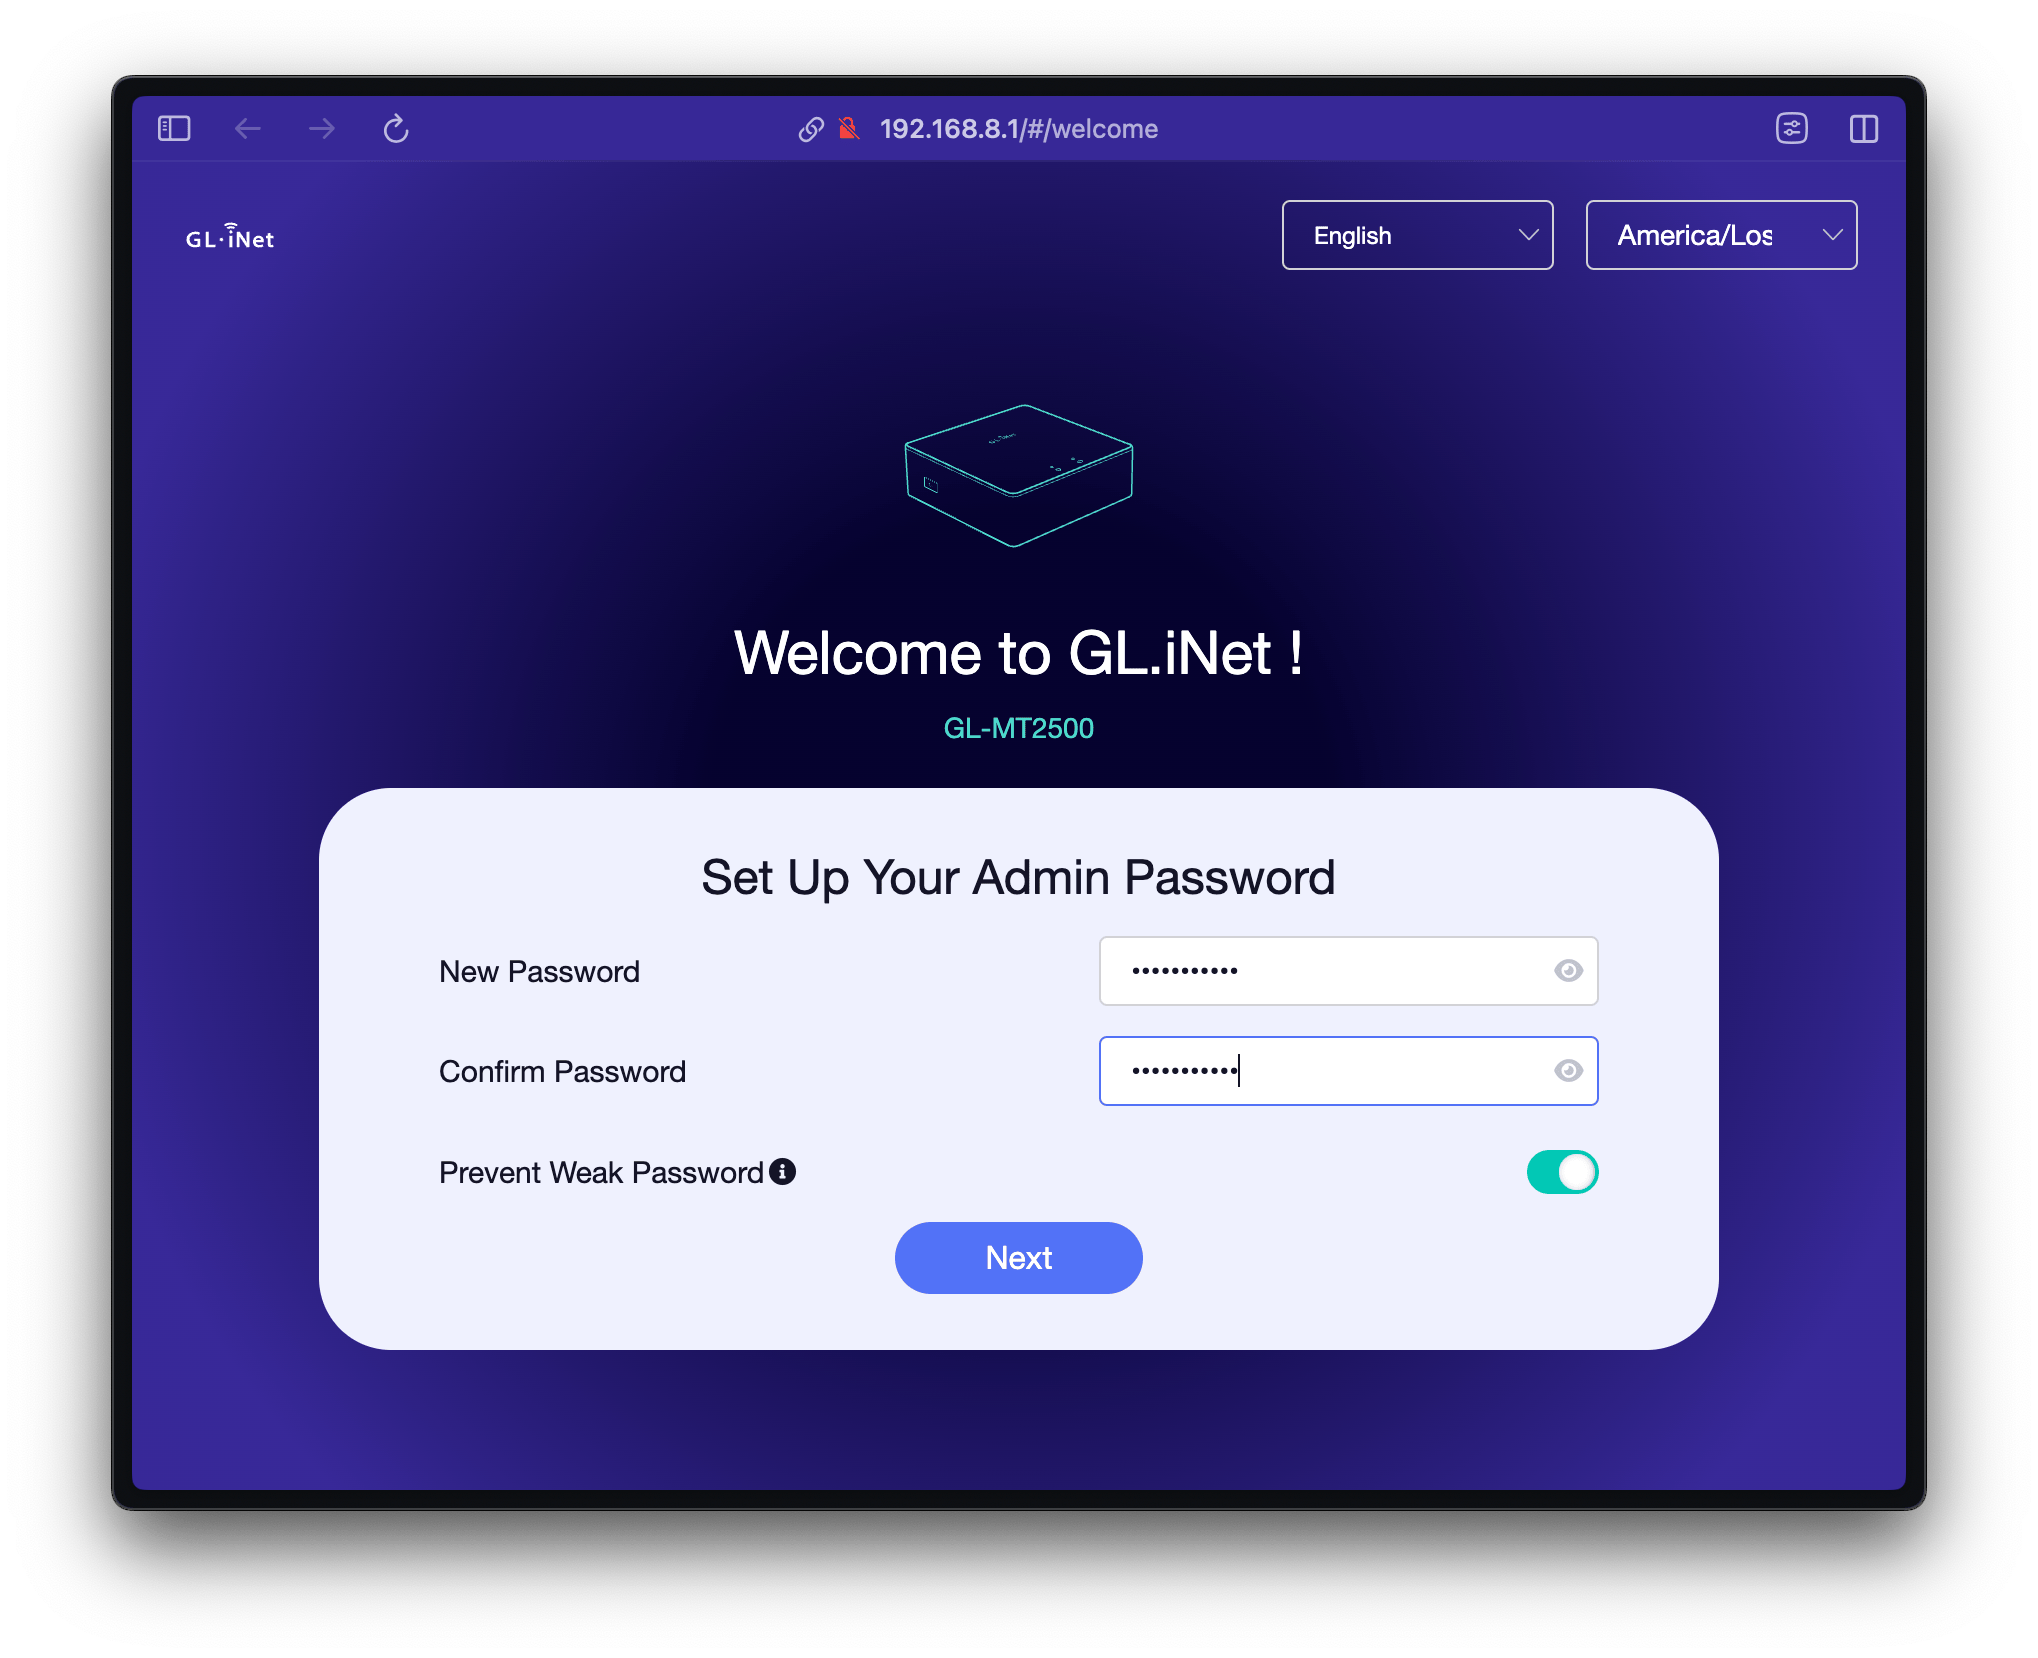
- When you visit http://192.168.8.1, the Brume 2 will display its setup page and prompt you to set a password
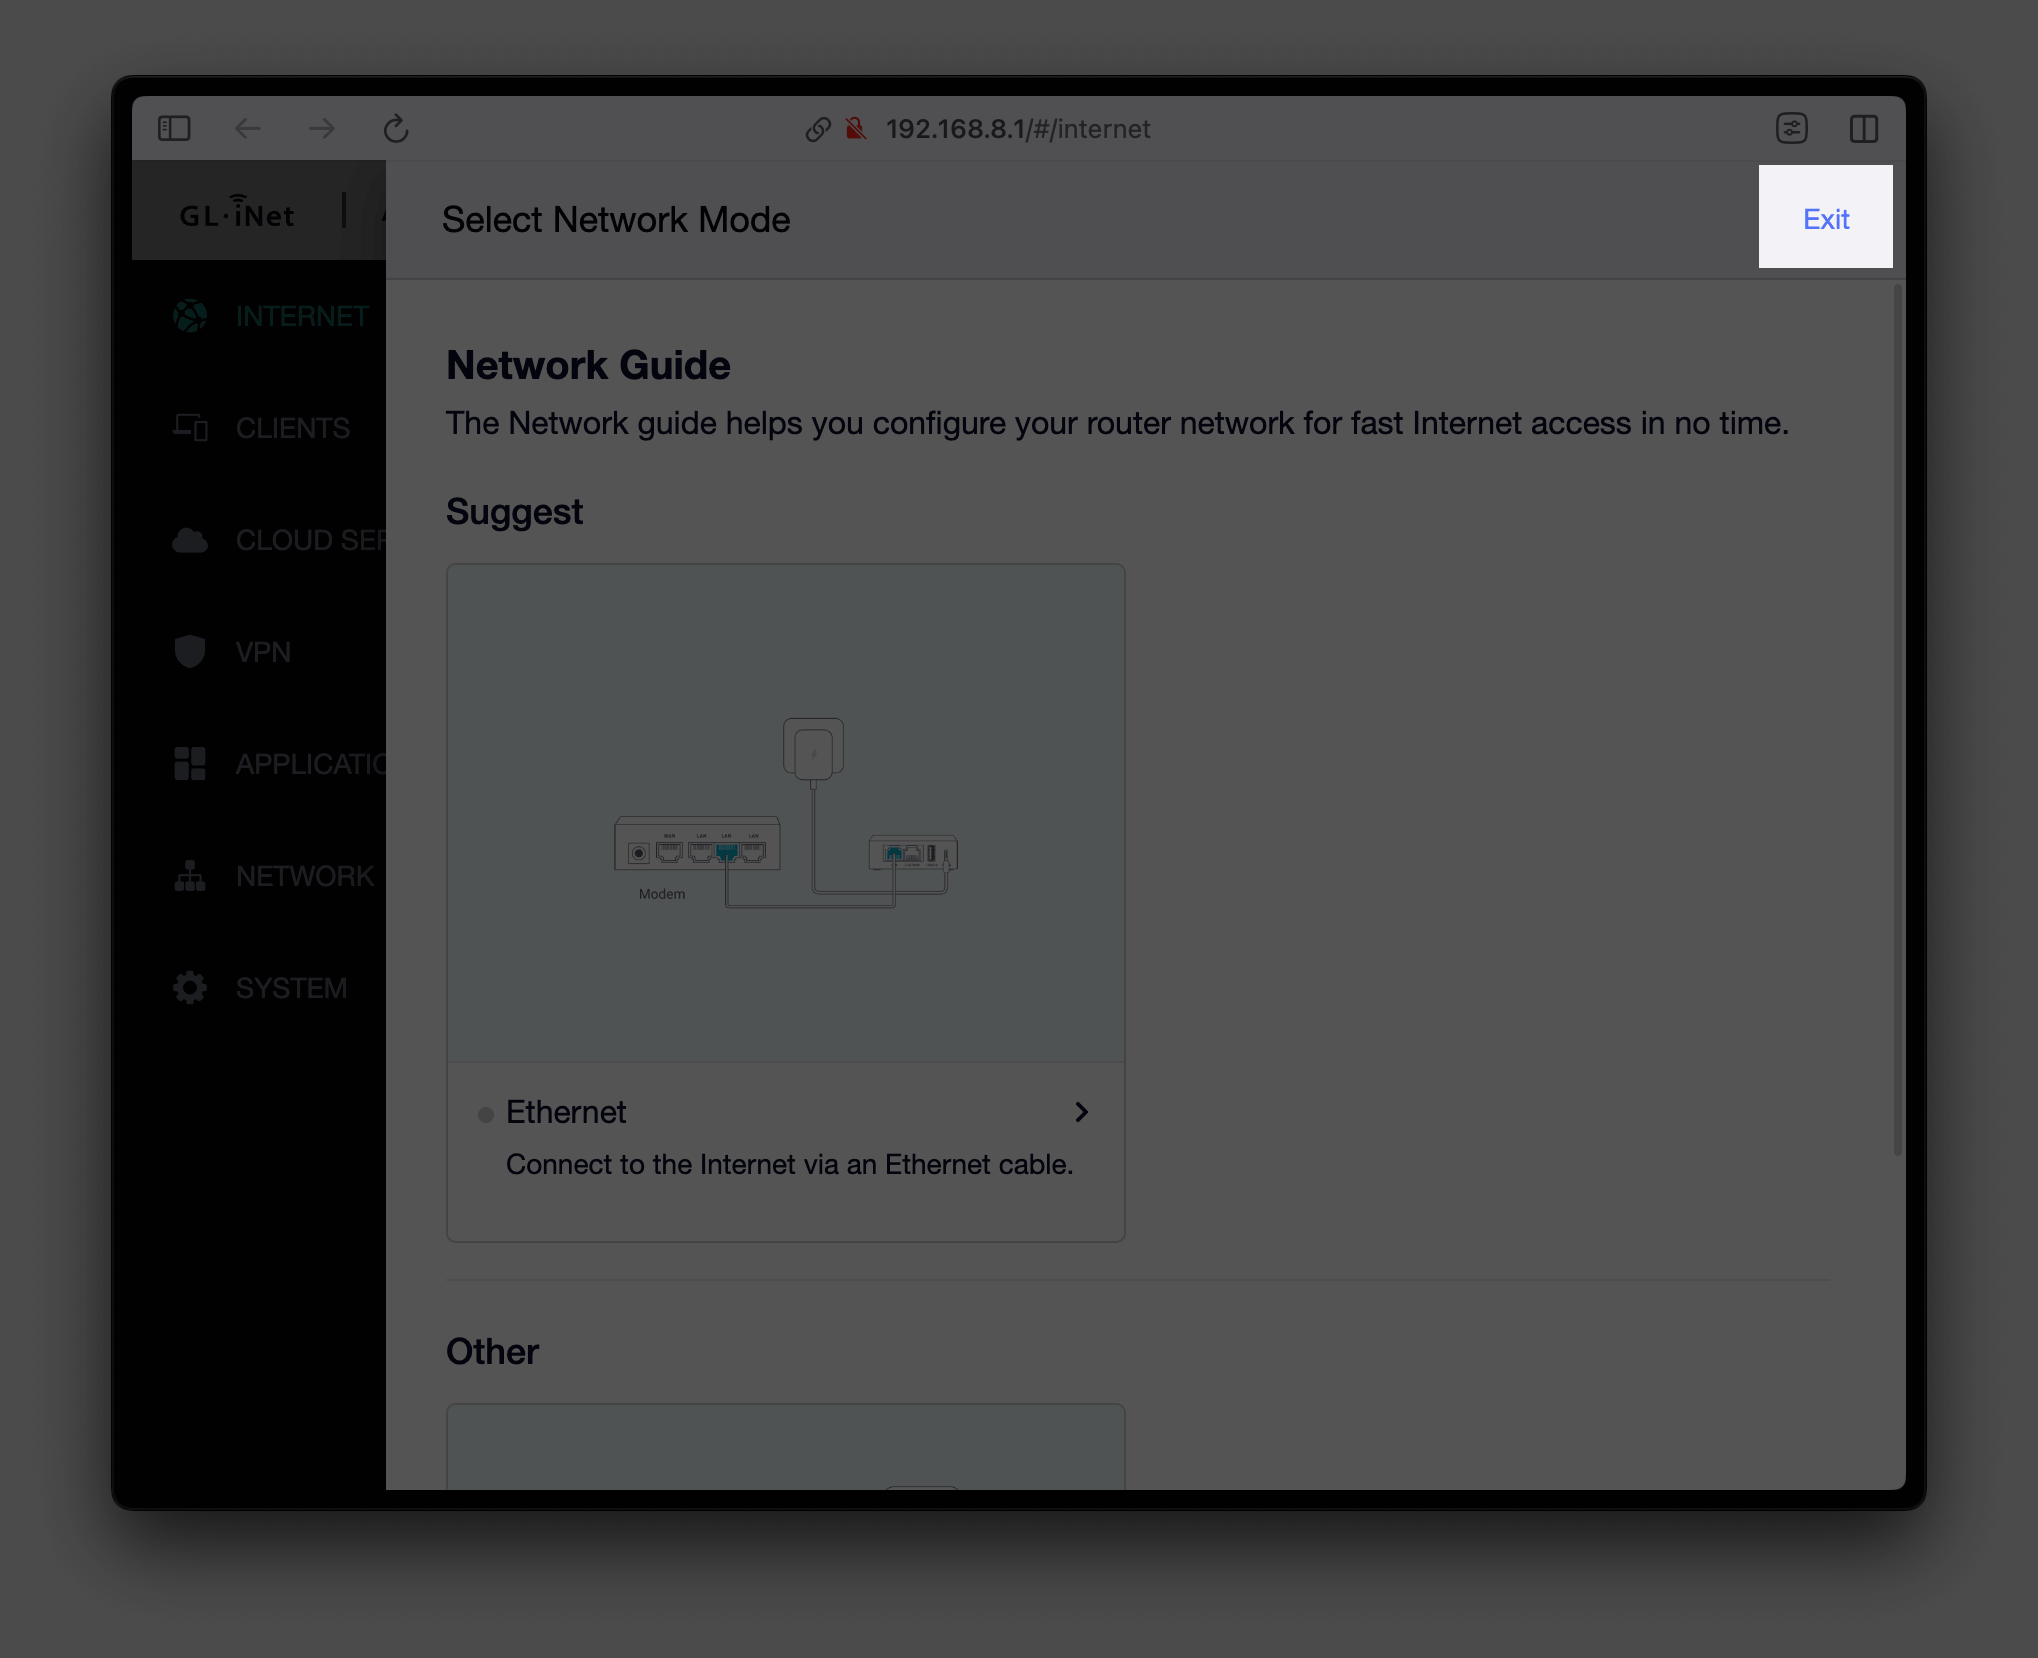
- Create a password as instructed and proceed to the main dashboard
- Dismiss the "Select Network Mode" prompt by clicking "Exit"
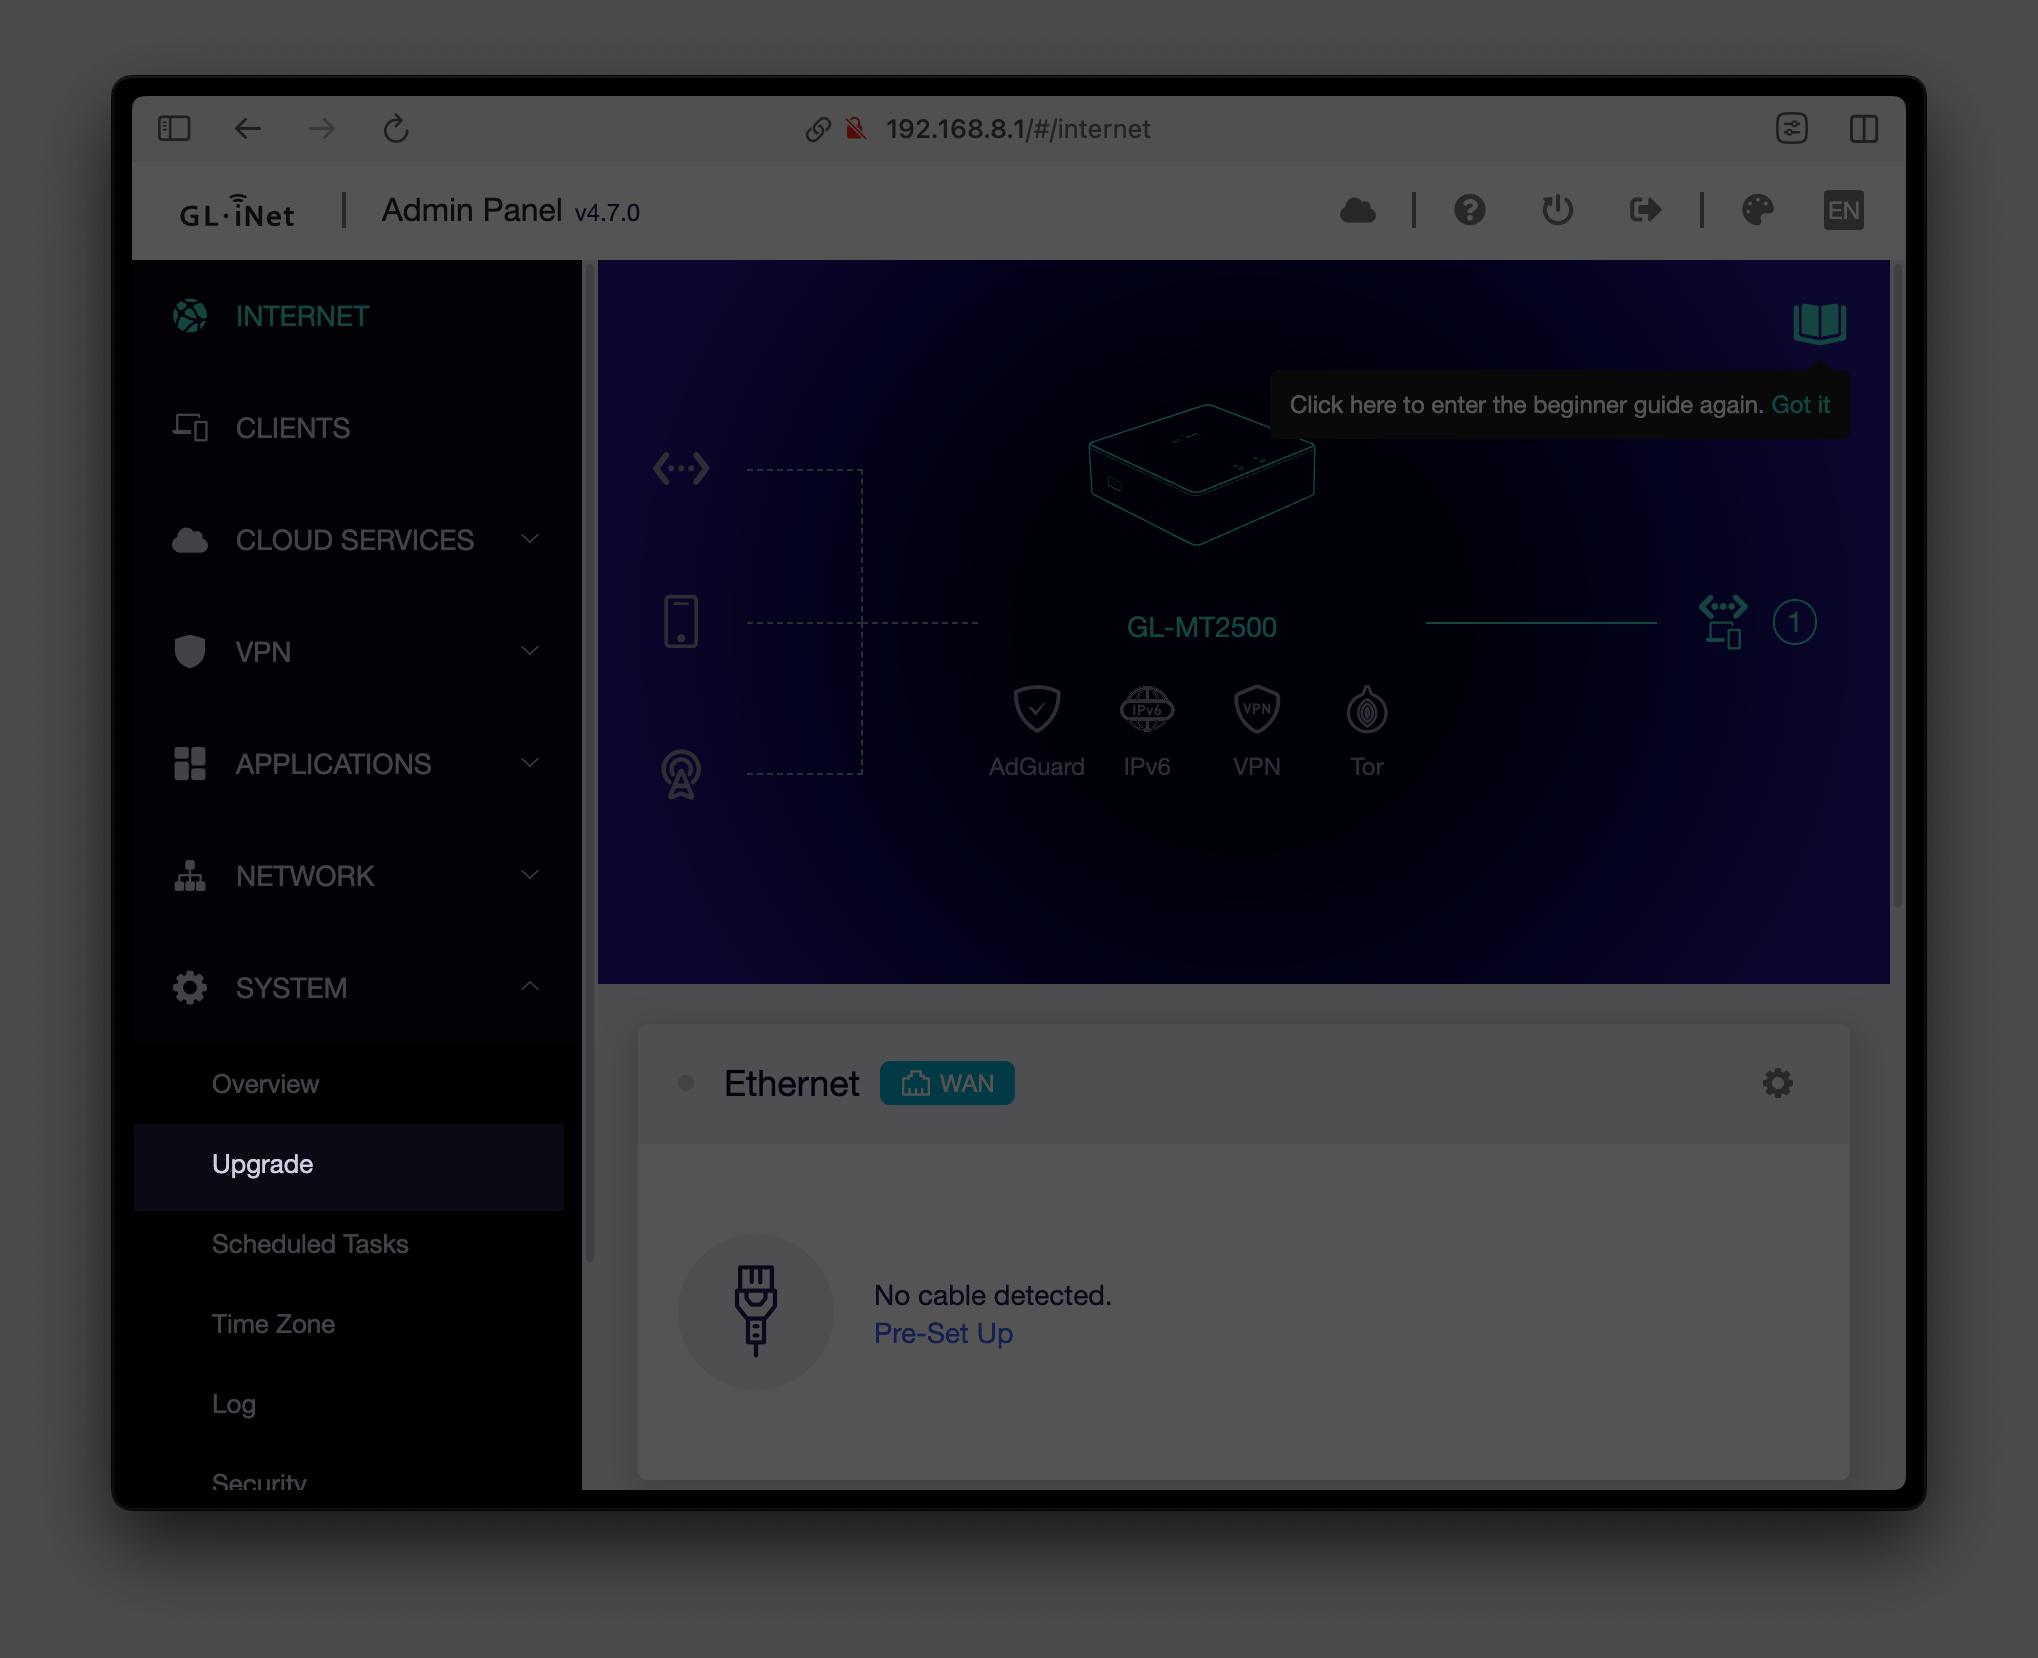
- In the navigation menu to the left, expand "SYSTEM" and then click "Upgrade"
- Click the "Firmware Local Upgrade" tab and then drag the .bin file you downloaded in Step 1 into the box
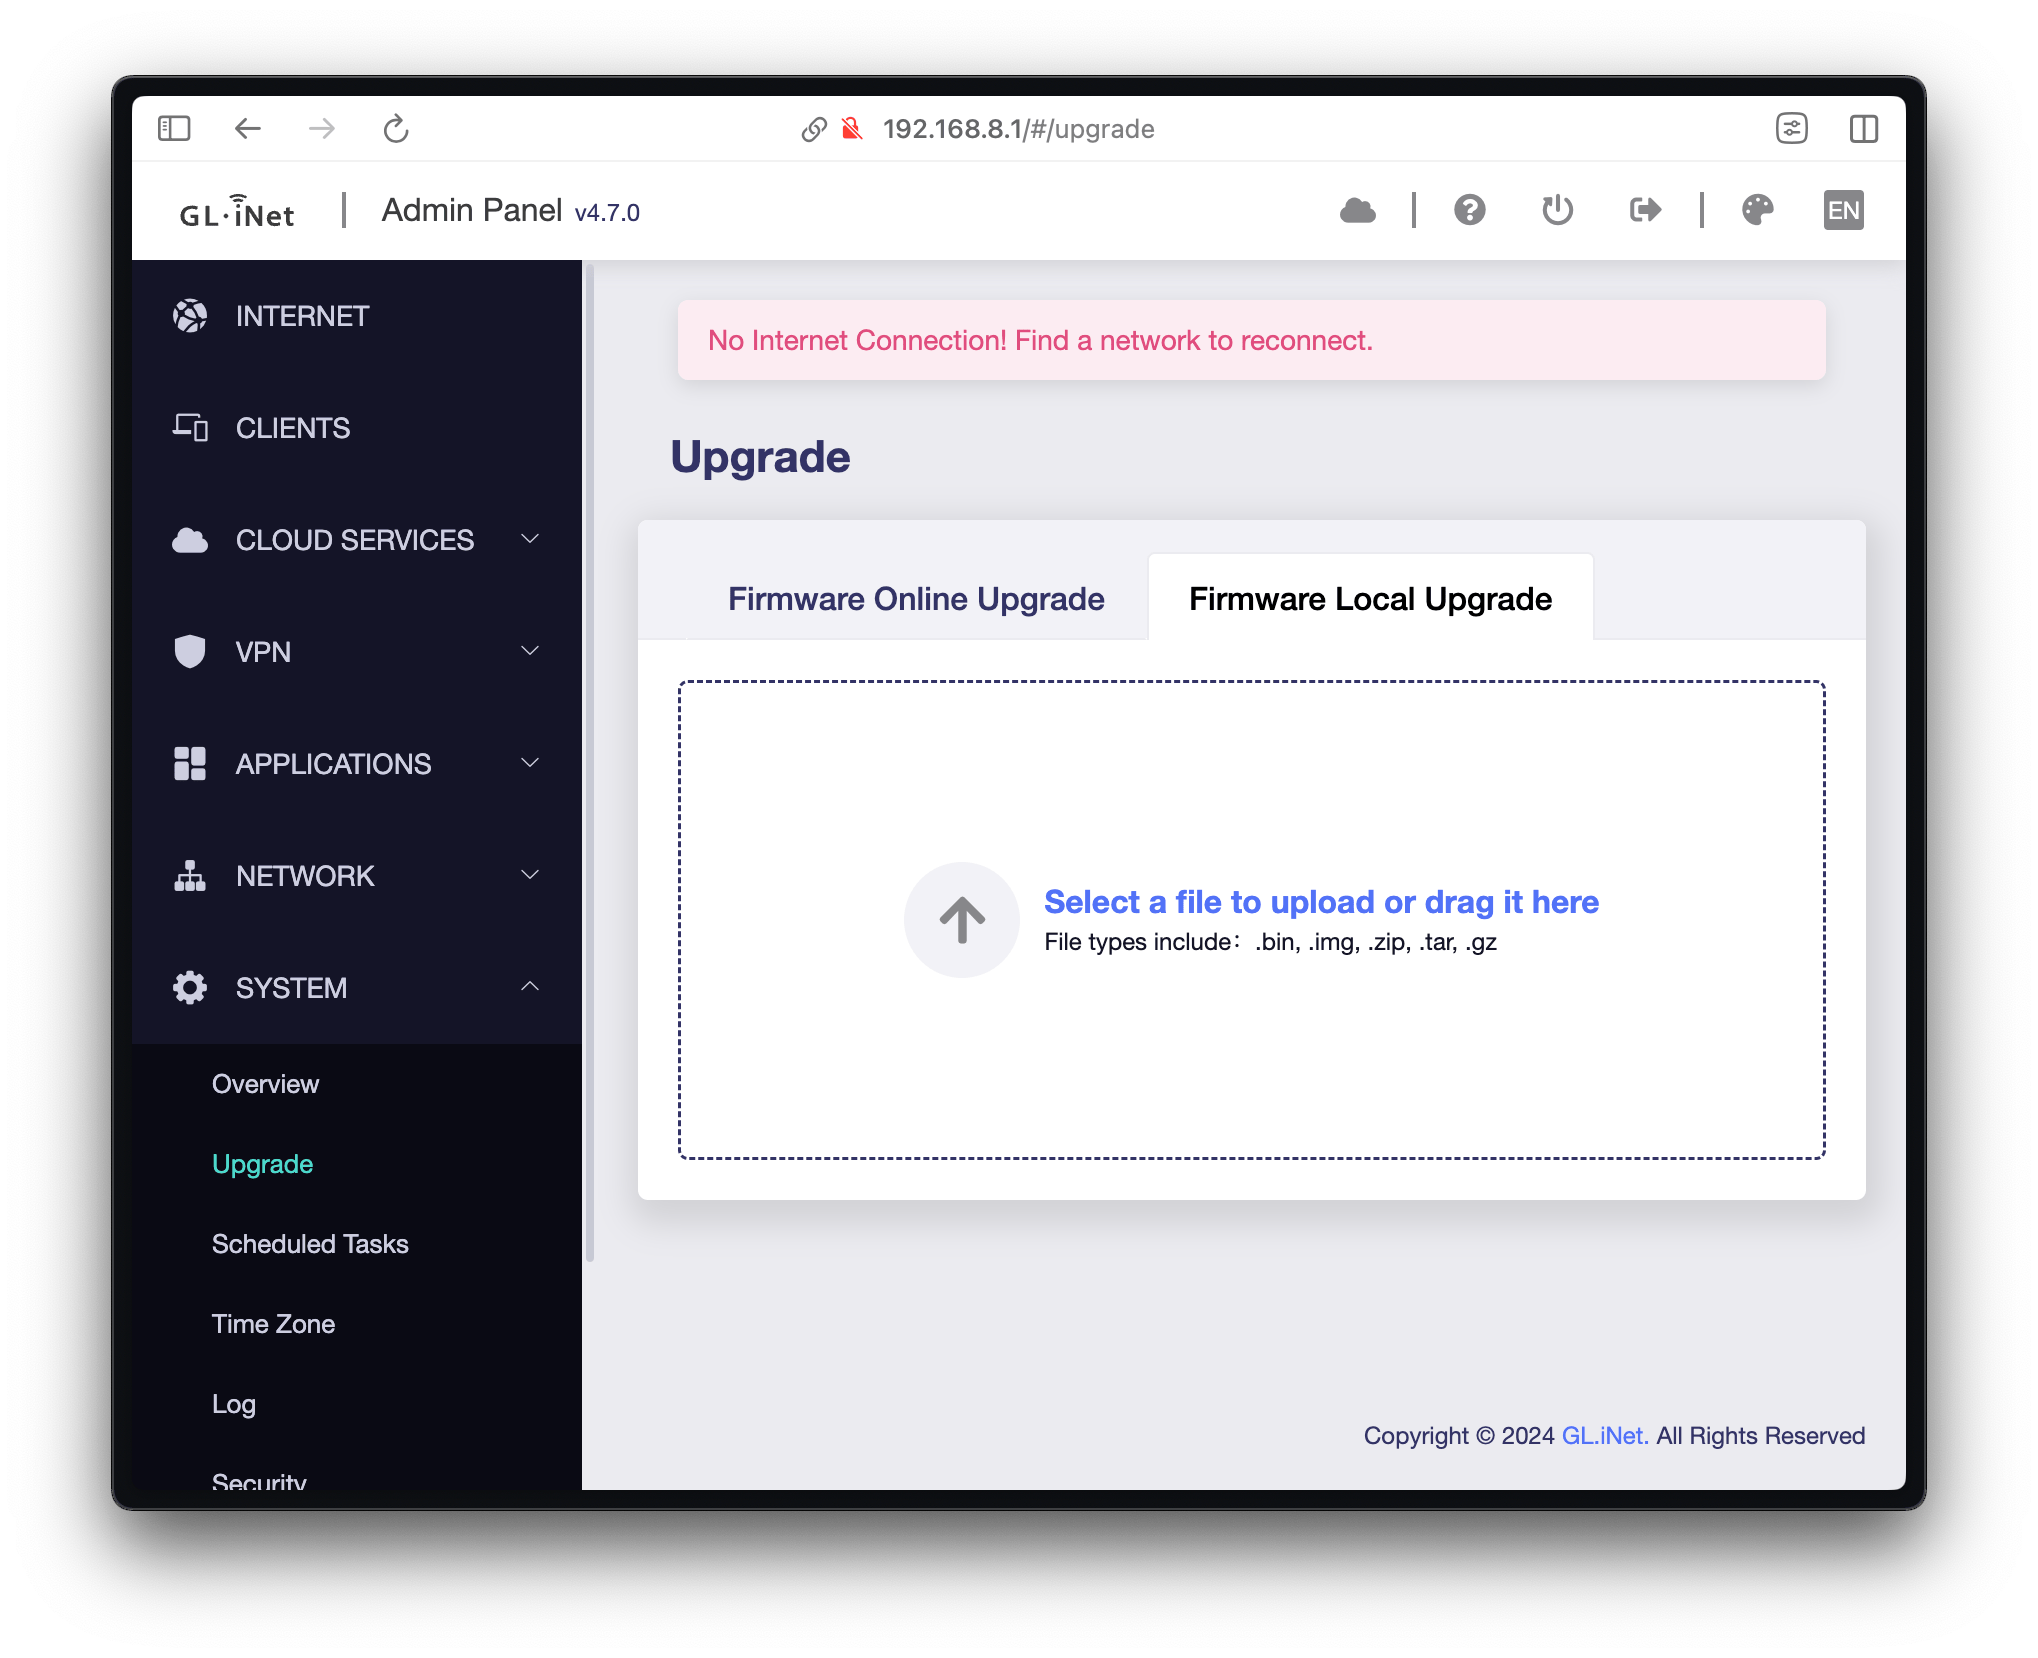
- Ensure that the "Keep Settings" toggle remains in the "off" state. Click the "Install" button
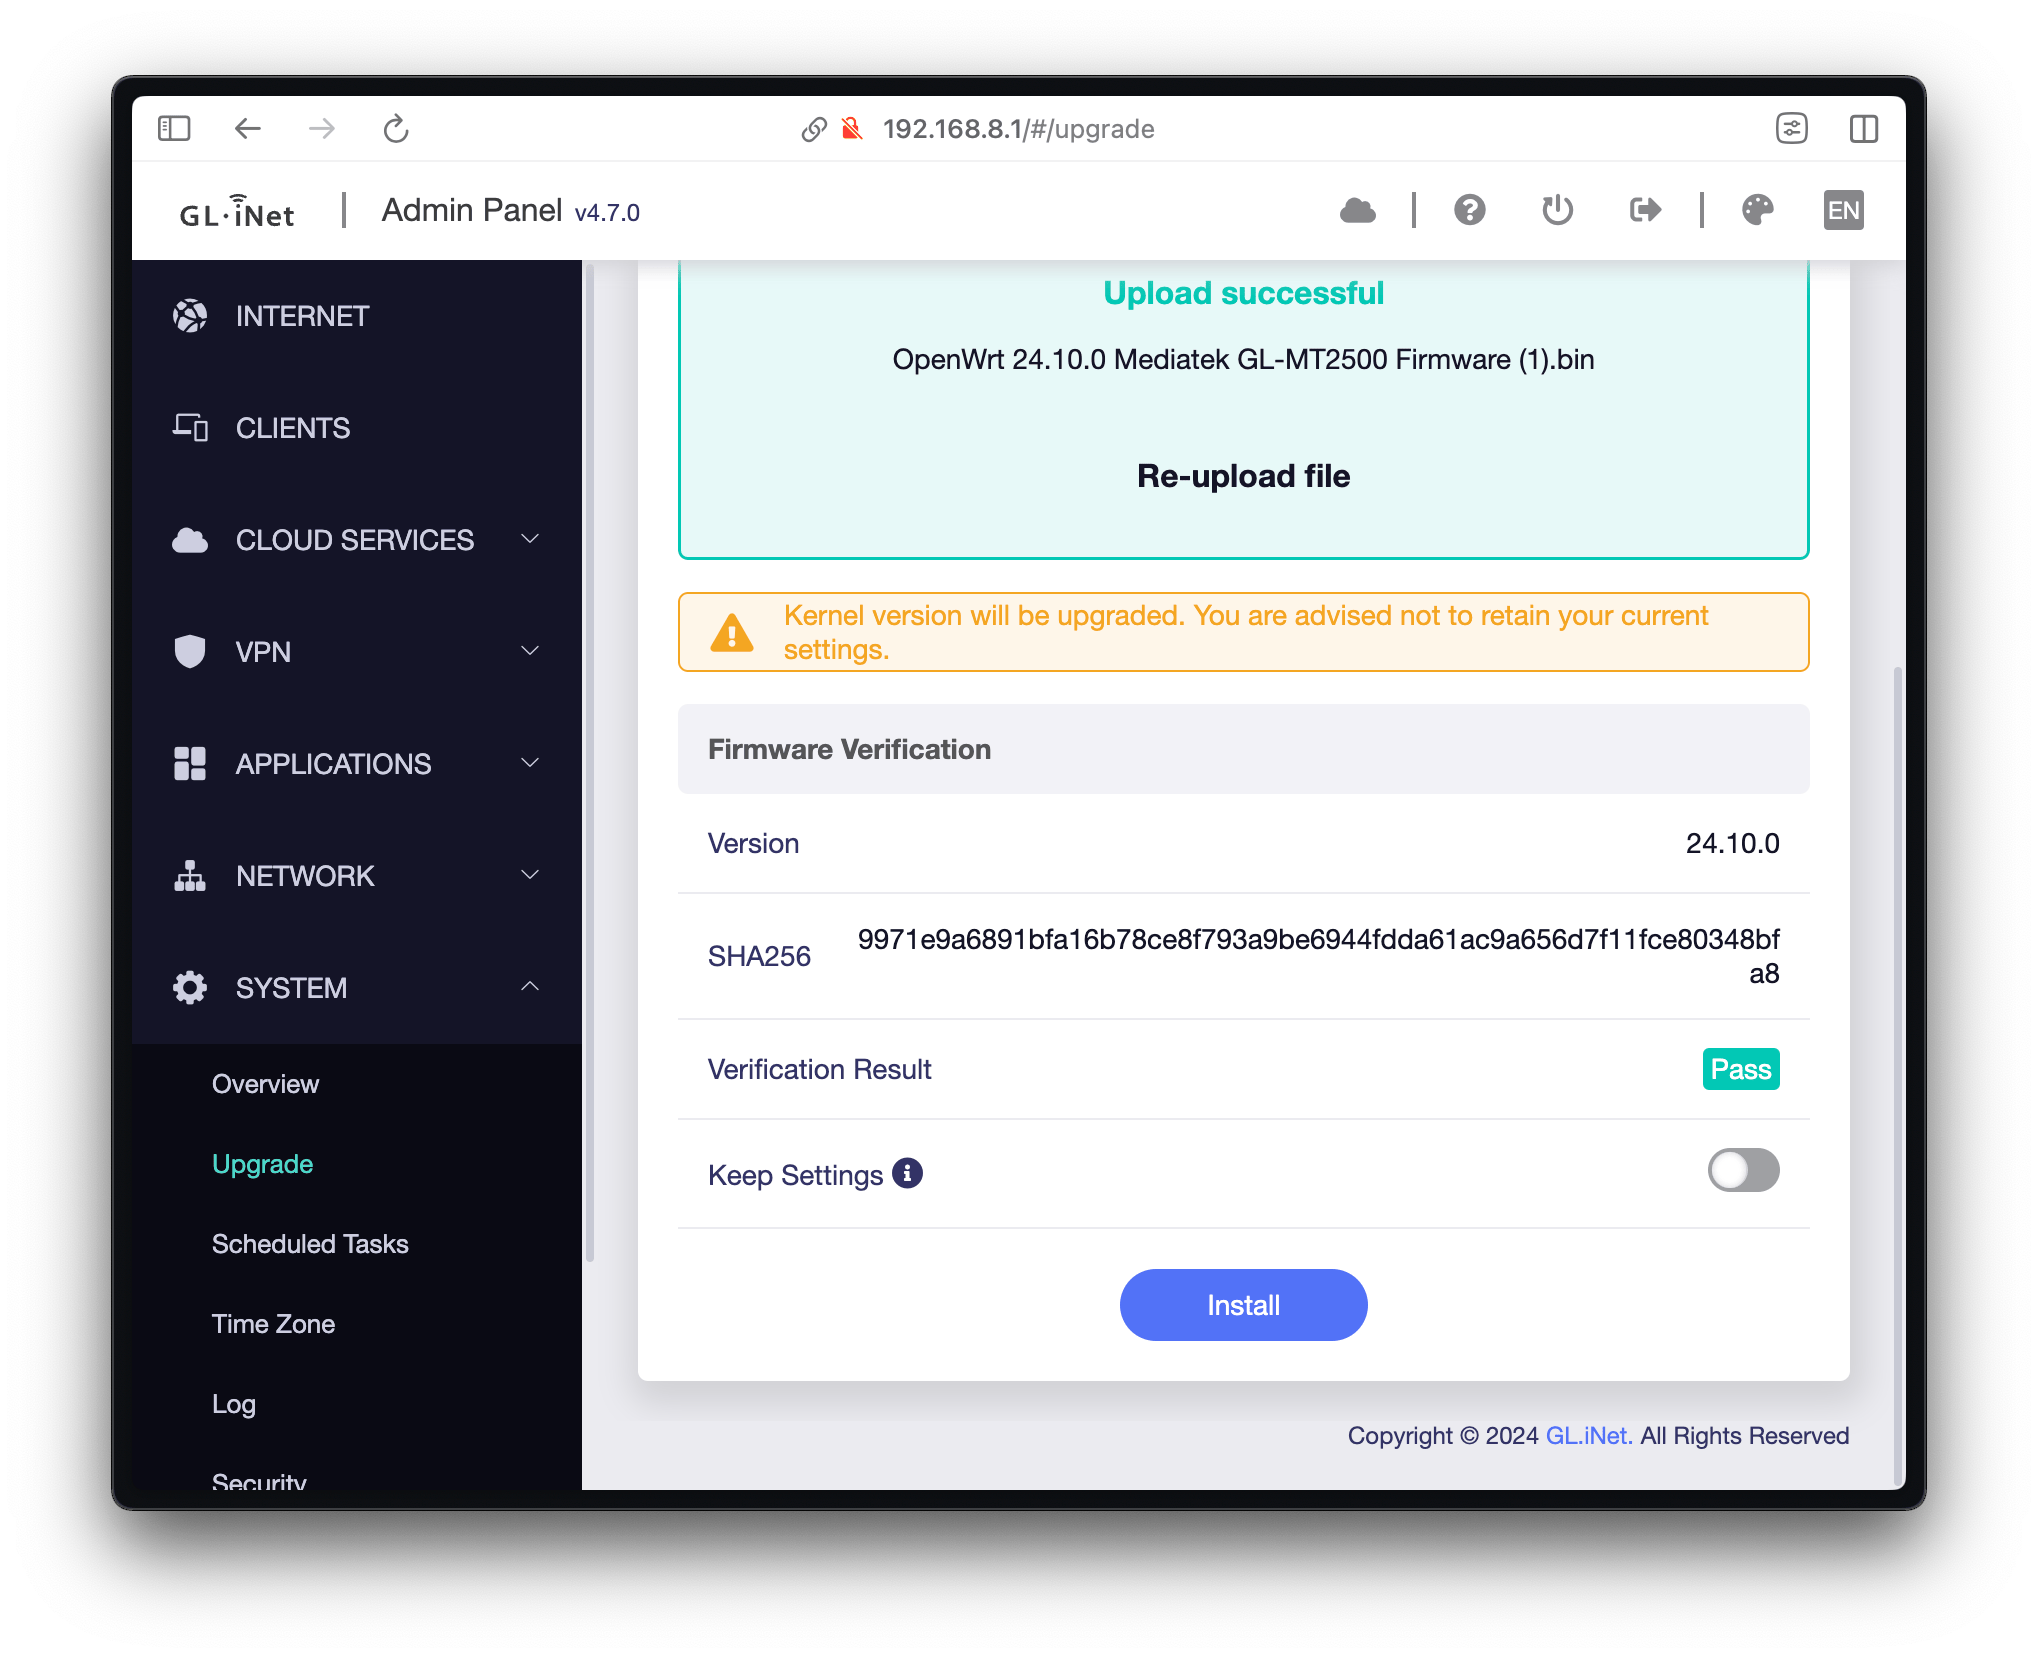
- You'll see a progress indicator - DO NOT disconnect power during this process
- The device will automatically reboot when the upgrade is complete
- Once the lights on the Brume 2 stop flashing and stabilize, unplug the Ethernet cable from the LAN port (the one connected to your computer)
- Open the Orb app on your phone or personal computer. Your new Orb should be automatically detected and ready to link to your account!
Step 4: Set a root password
Now we'll set a root password for your new device for security purposes:
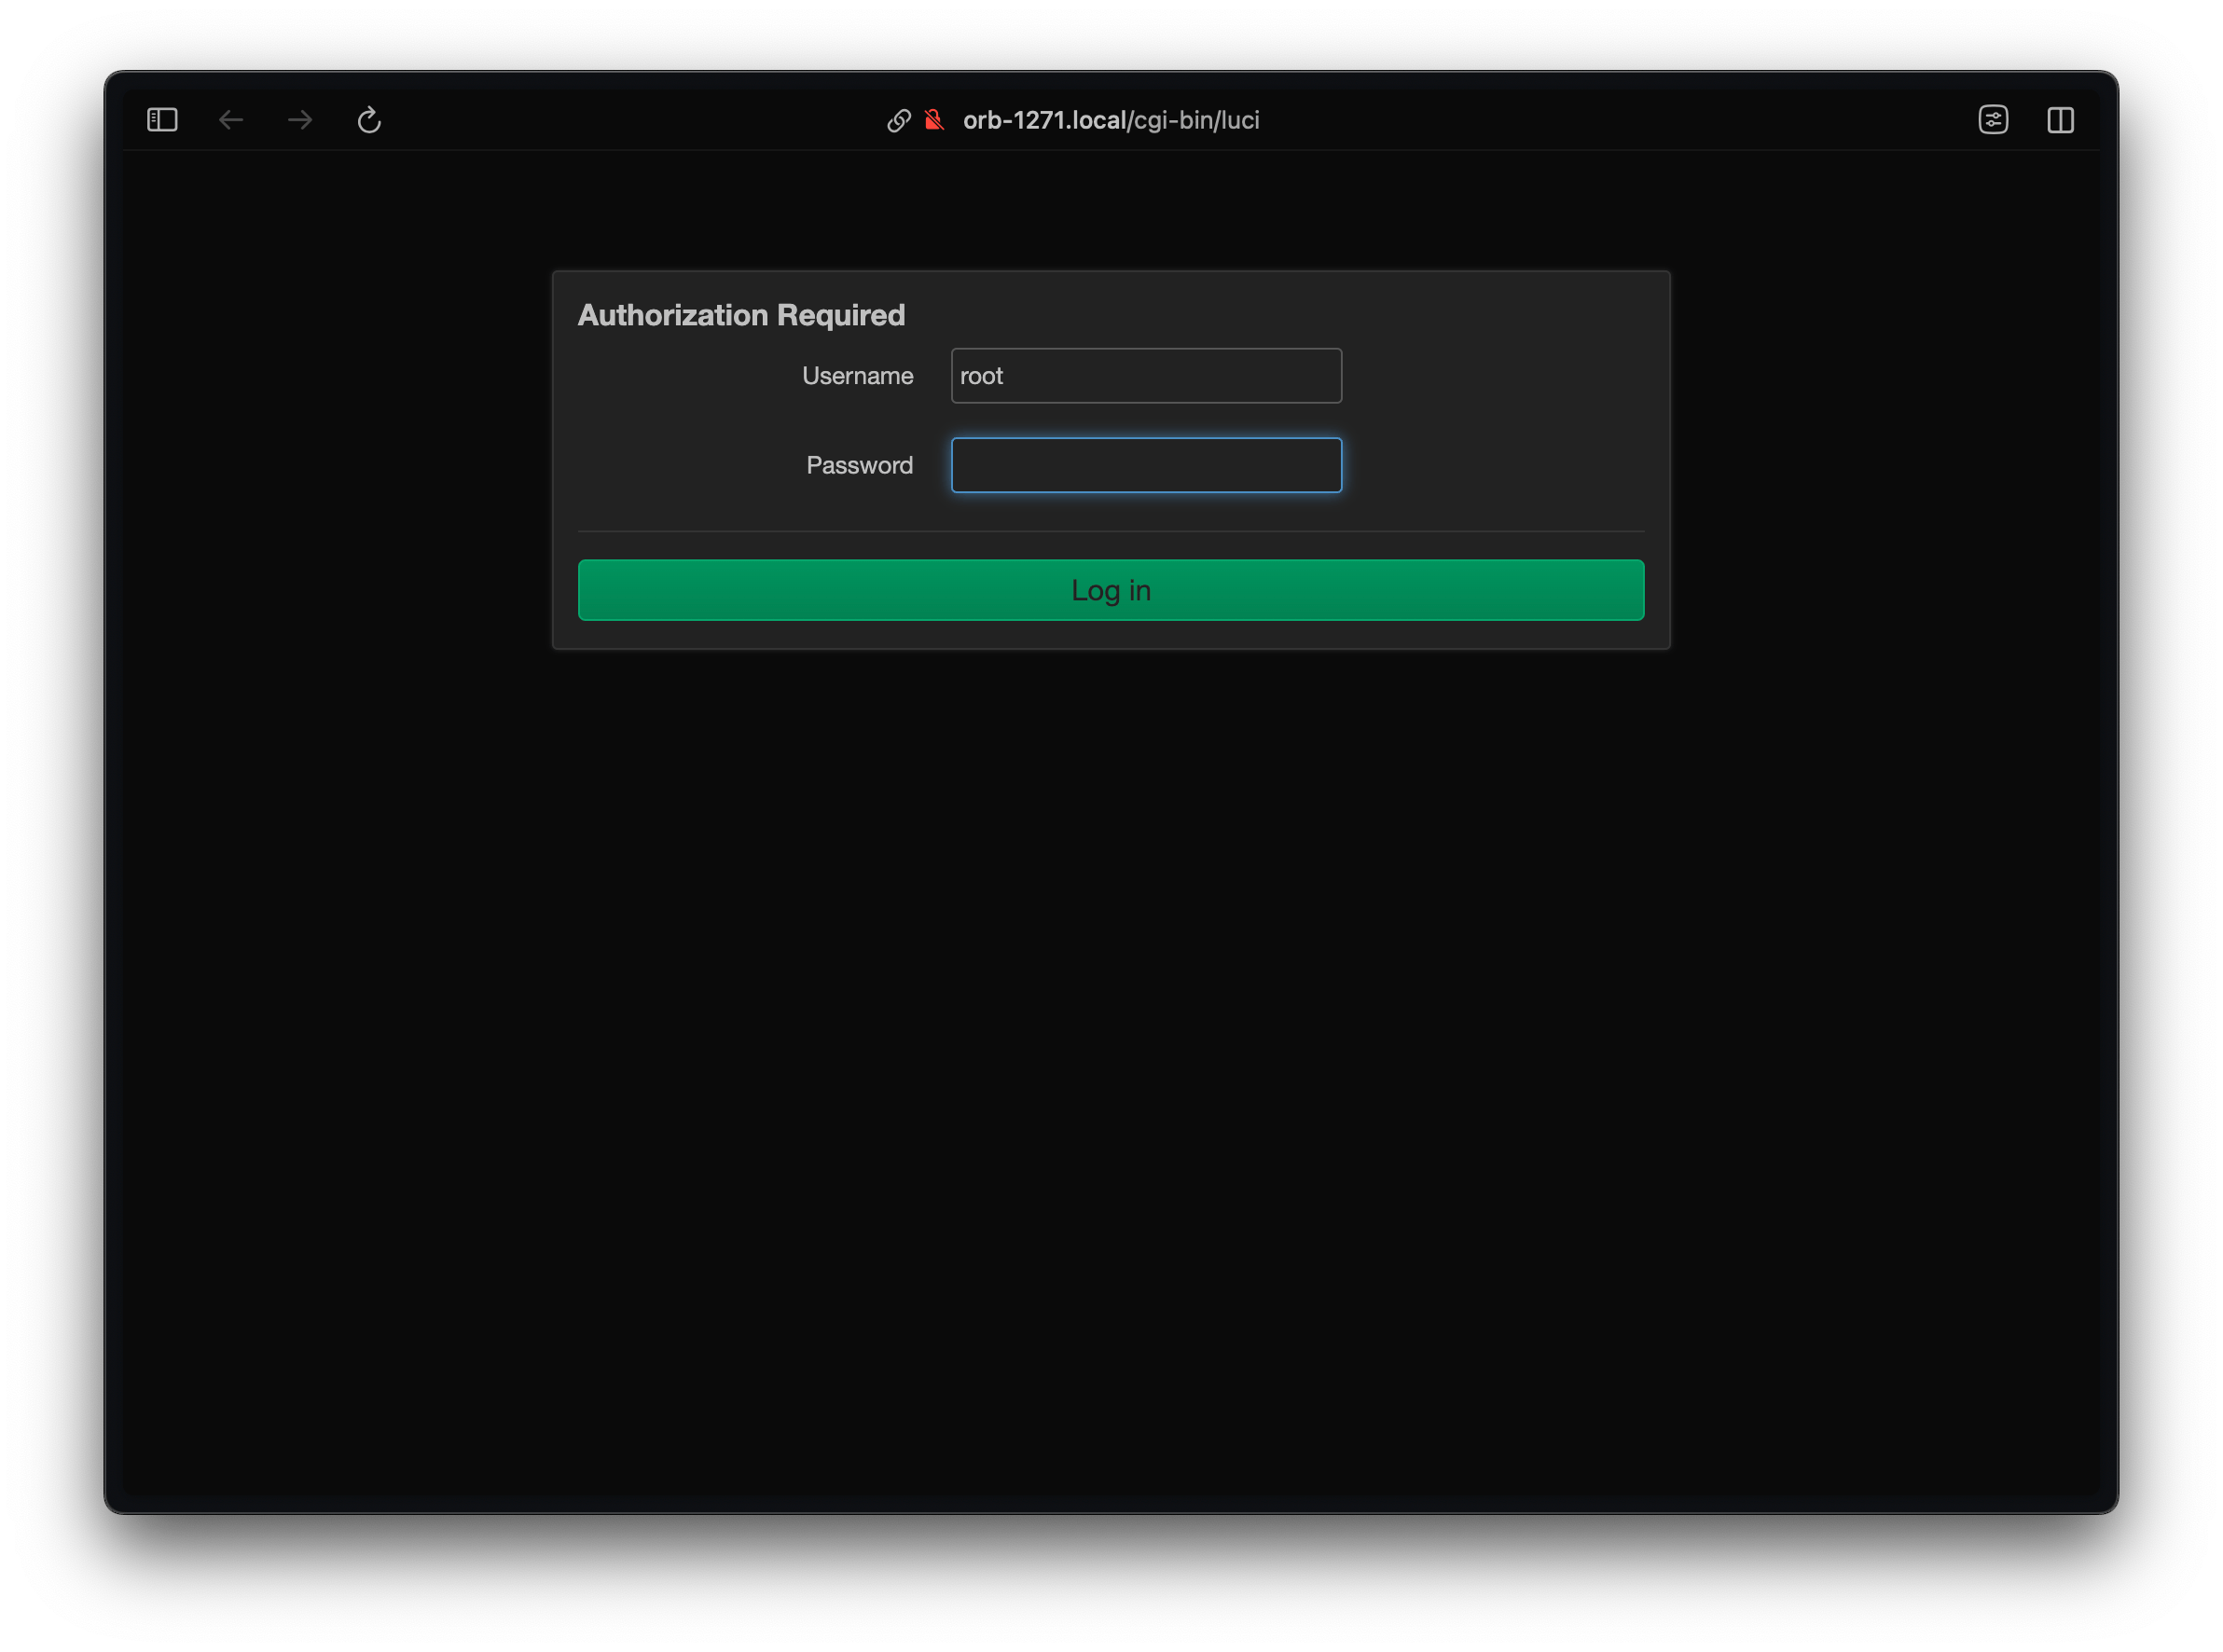
- The new Orb in the Orb app will have a name in the format of "Orb-1234" (where 1234 is a random number)
- To access the device's admin interface, open a web browser and visit http://orb-1234.local, replacing "1234" with the actual number shown in your Orb app
- Click the "Log in" button without setting a password
- You'll be prompted to set a root password for the device - this is important for security. Click "Go to password configuration..."
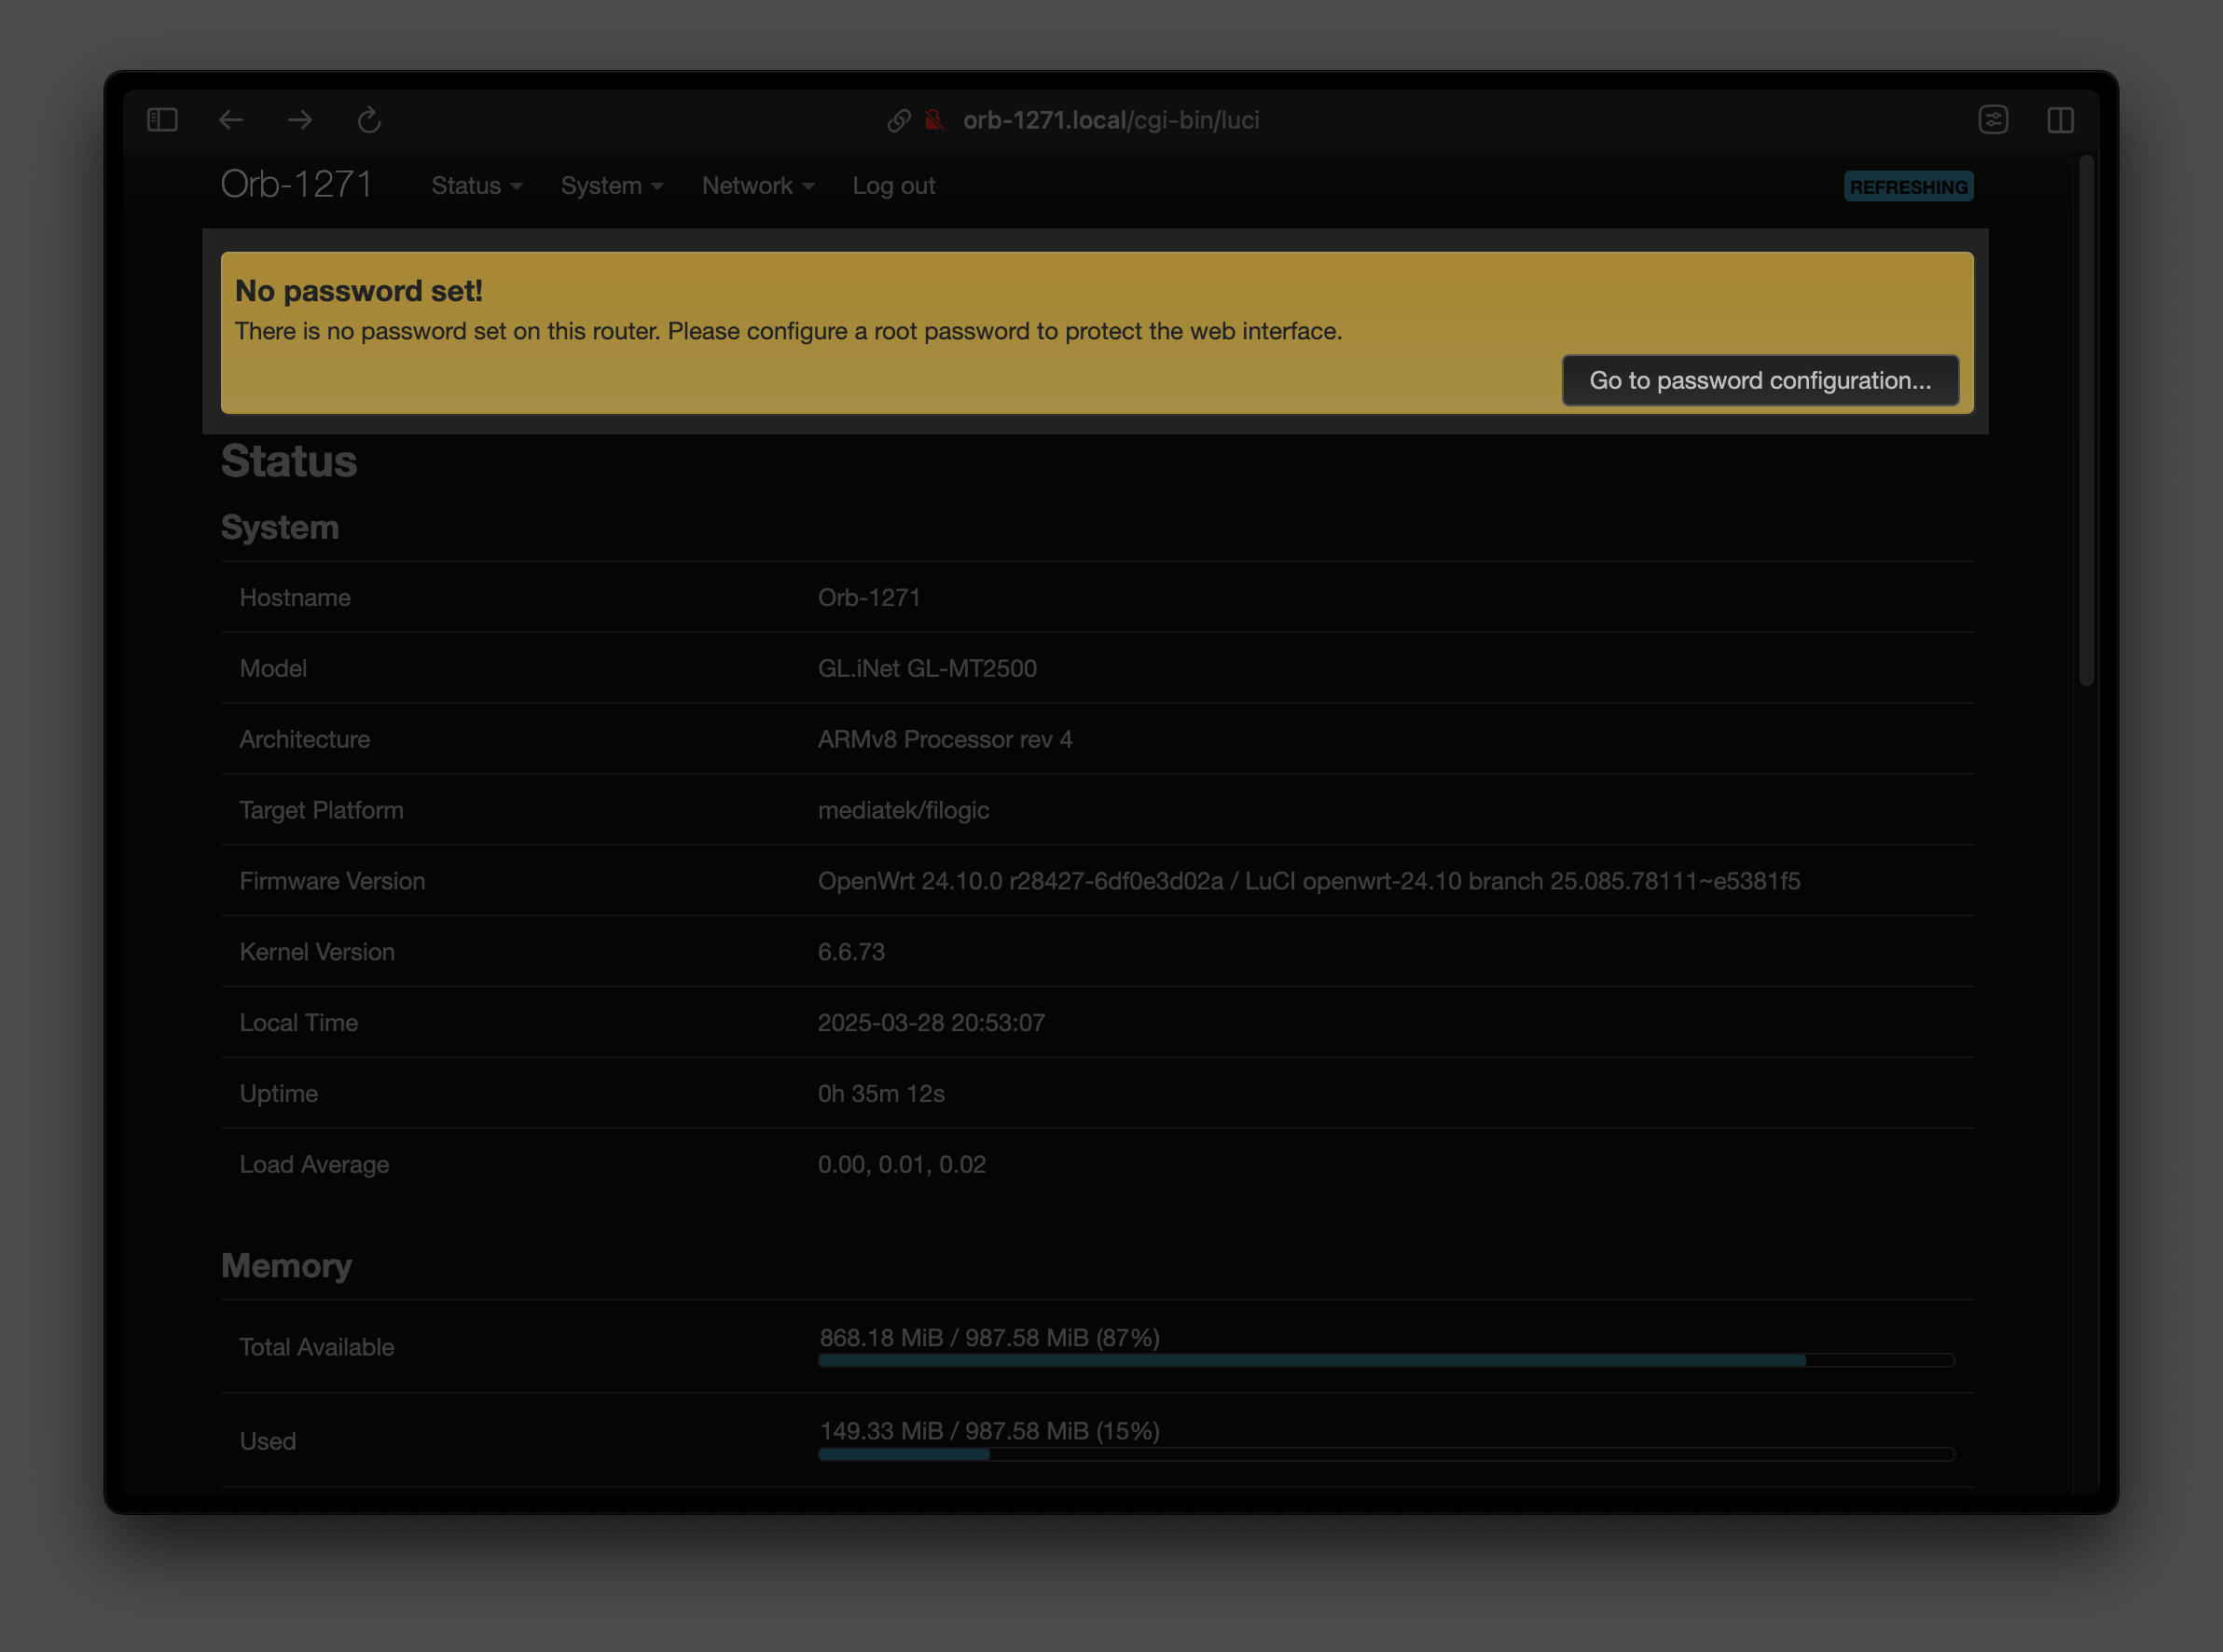
- Create a strong password that you'll remember
- Optionally, you can also change the hostname under System > System if you prefer a more personalized name to revisit the OpenWRT configuration page
Congratulations! You now have a standalone Orb device monitoring your network.
Troubleshooting
My device is unresponsive
Should you make a mistake and are no longer able to access your device, GL.iNet provides an excellent guide, including a video walkthrough, to Debrick Your Router Using Uboot.